
This is a collection of tips and tricks I use or have seen out there. I’m not saying they are the only way to do it. You probably have your own and I would love to hear your tips and tricks.
1 How to Prevent Food from Sticking
2 Easier way to clean that pan
4 Cutting Rounded Vegetables Safely such as potatoes
6 A Cleaner Way to Crack an Egg
7 Taking Your Oven’s Temperature
11 Cutting up a Pineapple into chunks – or how I do it
12 Storing Leftover Tomato Paste
15 How to Take a Turkey’s Temperature
17 Summer Produce That Tastes Great Raw
20 How to Eat a Pomegranate Frustration Free
21 Deseed a Pomegranate in Seconds Using a Wooden Spoon
24 Taste what you make before you serve it
37 How to help blanched or cooked veggies keep their color
45 Start with a glass of Wine – Wendy Saver

1. How to Prevent Food from Sticking
- Love the sear of a stainless skillet but not the way peppers can start to meld to the bottom midway through cooking? A little more oil should help. But don’t just pour it over the top of the food or you’ll end up with a greasy, soggy mess. Instead, use a metal spatula to loosen the vegetables or meat and push them to one side of the skillet. Then tilt the pan so the empty area is over the heat. Add the oil to the empty area (1 or 2 tablespoons should do it) and let it get hot before moving the food back. The heated oil on the hot pan will create a slick, nonstick surface, guaranteeing a surefire sauté.
2. Easier way to clean that pan
- I like to add a little water and bring to boil and using a metal spatula or a spoon scrap the bottom as if getting the brown flavor bits off for gravy.
3. Reviving Crystallized Honey
- Try this trick to bring honey back to a luscious, drizzly state: Place the container in a bowl of hot water until the honey is smooth and runny, 5 to 10 minutes. (Alternatively, remove the lid, then microwave the jar in 30-second intervals.) To prevent crystals from forming again, store the honey in a cool, dry place (not the refrigerator) and avoid introducing moisture. So no double-dipping once your spoon hits your tea.
4. Cutting Rounded Vegetables Safely such as potatoes
- To keep your fingers safe from nicks, use the following technique on wobbly vegetables (such as potatoes, squash, and beets). With a sharp knife, cut a thin slice along the length of the potato (or another vegetable) to create a flat side. Turn the potato cut-side down on the cutting board. This will ensure that the potato is stable and won’t roll away. Slice as desired, stopping when the potato becomes unsteady and difficult to grip. Turn the potato so that the broad, flat side from which you made the last cut is face down on the cutting board. Continue to slice as desired.
top
5. How to Grill Corn
It’s hard to beat the smoky-sweet flavor of fresh corn cooked on a grill. Here’s how to do it.
- Pull the husks back from the corn, but leave them attached at the stem. Remove and discard the silks.
- Pull the husks back up around the corn. Soak the ears in a roasting pan or large bowl full of water for 15 minutes. (The water will prevent the husks from burning.
- Grill the corn over medium heat, turning often, until the kernels are tender and the husks are lightly charred, 8 to 10 minutes.
6. A Cleaner Way to Crack an Egg
- When you tap an egg on the edge of a bowl, you don’t break just the shell. The thin membrane surrounding the white and the yolk also ruptures, so tiny shell shards can mix with the liquid and end up in your finished dish. (Worst omelet ingredient ever.) Instead, crack the egg on a flat surface, like a counter, to create one clean break. That way, the membrane stays intact, meaning no shell in your scramble.
- Hold the egg in one hand and tap it firmly on a hard surface. You don’t want to smash it though!
- Check the break: You should see an indentation and one side-to-side crack, like an equator.
- Place your thumbs on either side of the crack and gently pull the shell apart. Any shards will stick to the membrane, not fall into the bowl.
Note: I like to use a piece of shell to remove any bits of shell that might fall in when you use the edge of bowl.
7. Taking Your Oven’s Temperature
- Ovens can lie. Yours may say 350° F, but your last batch of brownies was squishy even though you followed the baking time. What gives? After a while, ovens may lose accuracy, running up to 25 degrees too hot or cool. To test yours, place an oven-safe thermometer on the middle rack and heat the oven to 300° F; when the oven indicates it has reached that temperature, check the thermometer. If it reads 275° F, you’ll know that you need to set the temperature 25 degrees higher. Or seek a permanent fix by calling a repairman recommended by the manufacturer.
top
8. How to Chop Garlic
- No more struggling with sticky, paper-thin peels. With these three steps—trim, crush, chop— you can prep a clove in no time.
- Trim. Use the tip of a chef’s knife to slice off the hard root of each clove. This will allow the skin to peel away more easily.
- Crush. Place a clove under the flat side of the knife, with the blade facing away from you. Press the heel of your palm or your fist down on the knife until you feel the clove give way. Slip off and discard the skin.
- Chop. Gather together the peeled cloves, hold your knife by the handle, and place your other, nondominant hand on top of the blade. Rock the knife up and down through the cloves (the tip stays on the cutting board). Chop until the garlic is the size you desire.
Bones are the thing that gets me with fish and is probably the main reason I am not a big eater of fish, stupid reason eh?
Before salmon fillets make it into the supermarket seafood case, the fishmonger has taken out the backbone and the ribs. But he doesn’t always catch the thin, soft pin bones that “float” in the flesh. Here’s a quick way to remove them at home.
- Run your index finger along the center seam of the fillet, going against the grain. If there are any pin bones present, you’ll feel them protruding at about half-inch intervals.
- With clean tweezers, grasp the tip of the bone and tug, pulling at a slight angle instead of up and out (pin bones grow slanted toward the fish’s head). Repeat as necessary.
- Midway through the banana bread recipe, you realize that your brown sugar is one rock-hard mass. Solution: Place the block of sugar in a bowl, sprinkle with a teaspoon of water, cover with a damp paper towel, and microwave in 30-second intervals, checking between each, until soft. (This may take several minutes.) To keep a new package fresh, place the entire bag of sugar in an airtight container or a resealable freezer bag; store at room temperature.
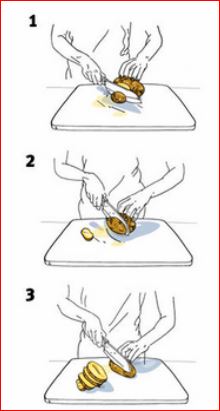
11. Cutting Up a Pineapple into chunks – or how I do it
Supermarkets can charge twice as much for sliced pineapple as they do for the same amount of whole fruit. Here’s an easy way to handle this prickly job yourself.
- With a serrated or chef’s knife, cut off the top of the pineapple and a thick slice from the bottom.
- Stand the pineapple upright and, working from top to bottom cut the pineapple lengthwise into wedges,
- Then using a long thin knife run it down to cut out the piece of core from each wedge.
- place the wedge skin down and using the same knife cut off the skin in following the shape of the fruit. Use a small paring knife to remove any remaining eyes.
- Slice or cut the pieces into chunks as desired. I use the skin as a tray to place in container. Cut-up pineapple will keep for up to 3 days in the refrigerator.
Note: it may sound odd but my treat for all that work is eating away the sweet tender meat from the pieces of cut off core and skins. Messy you bet, but a little water and I am satisfied and clean as a whistle.
top
12. Storing Leftover Tomato Paste
- Most recipes for pasta sauce and chili call for only a couple of tablespoons of tomato paste. If your paste comes in a tube, leftovers aren’t a problem. But if it’s in a can, don’t toss the remainder or let it dry out in the refrigerator. Instead, freeze it in tablespoon-size portions in an ice-cube tray. Once they’re solid, transfer the cubes to a plastic freezer bag. Later add them directly to recipes—no need to thaw. Try this with chipotles in adobo and pesto, too.
Note: We also do this for Myer lemon juice since my wife is in love with that lemon.
Forgot to take the sticks out of the refrigerator in advance? Here are two ways to speed the process along.
- Fast: Cut the sticks into pieces and set out on a counter. In 10 to 15 minutes, you’ll be good to go.
- Faster: Microwave the pieces on low in 20-second intervals, checking in between. The butter is ready when it’s malleable but not mushy.
From storing to cooking, here’s how to make the most of these tasty little gems.
- Freeze shelled nuts to preserve their natural oils, which can turn rancid at room temperature. Stow each type of nut separately in an airtight container marked with the date. After a year, it’s time to toss them.
- Toast nuts to give them more flavor. (Don’t be tempted to skip this step in a recipe—the little time it takes has a delicious payoff.) Simply spread on a rimmed baking sheet and cook in a 350° F oven, tossing occasionally, until they’re fragrant and their interiors are golden (break a nut in half to check), 5 to 10 minutes.
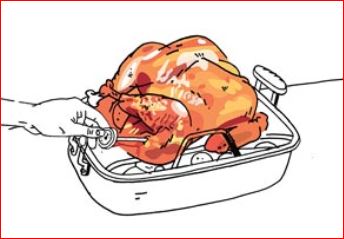
15. How to Take a Turkey’s Temperature
- Using an instant-read thermometer is the best way to ensure a moist, juicy roast. But where do you put it? The most important thing to remember: Never place the probe too close to the bone or you’ll get an inaccurate reading. “Bones conduct heat at a different rate than meat and can range in temperature, depending on where they are in the bird,” says Simon Quellen Field, the author of Culinary Reactions: The Everyday Chemistry of Cooking ($17, amazon.com). The easiest method? Slide the thermometer into the thigh horizontally, just until it touches the bone, then pull it out slightly. Once it registers 165° F in the thigh—the slowest-cooking part of the bird—you’ll know that dinner is done.
<top
Coating ingredients in flour, egg, and bread crumbs is the surest path to an extra-crispy crust, but it can turn your hands into a sticky, clumpy disaster. Follow this neat technique to solve that problem.
- Arrange your ingredients from your left to your right in this order: the food you want to bread (such as chicken fillets), flour, egg, and bread crumbs. Using your left (“dry”) hand, turn the chicken in the flour to coat both sides, then drop it into the bowl of egg.
- Using your right (“wet”) hand, lift the chicken from the egg, shake off the excess, then drop it into the bread crumbs.
- Using your left (“dry”) hand, turn the chicken in the bread crumbs to coat both sides. Tap off the excess bread crumbs, then transfer to a clean plate. Repeat with the remaining chicken.
Note: in the excitement I will forget and use the same hand building up a huge globby mess. I keep a bowl of water to dip my hand in when this happens.
17. Summer Produce That Tastes Great Raw
Try incorporating the following vegetables au naturel in salads and slaws.
- Asparagus: Thinly slice or, if slender, use whole.
- Beets: Shred on a box grater.
- Broccoli: Cut into florets or finely chop.
- Corn: Cut the kernels off the cob.
- Green beans and sugar snap peas: Thinly slice or use whole.
- Kale and chard: Discard the stems and thinly slice the leaves.
- Turnips and kohlrabi: Thinly slice or cut into matchsticks.
- Zucchini and summer squash: Thinly slice or use a vegetable peeler to cut into ribbons.
- If you’re frying up shrimp or chicken, don’t rest the cooked pieces directly on a plate—the residual heat will become trapped under the food, creating steam and turning everything soggy. Instead, use a cooling rack (set on a rimmed baking sheet to keep counters clean). With room for air to circulate, fried morsels will maintain their satisfying crunch until dinner
Aluminum Foil
- I leave a sheet of foil on the grill so during preheating it burns of any leftover residuals. It last quite a few reuses.
- As a makeshift grill brush. A clean grate prevents food from sticking. If you don’t have a wire brush on hand, crumple a sheet of foil into a ball, hold it with tongs, and use it to scrape off any bits stuck to the grate. (Do this while the grill is hot, both before and after cooking.)
20. How to Eat a Pomegranate Frustration Free
Pomegranates are a delicious but extremely frustrating fruit to eat. Using the technique outlined here you’ll put more pomegranate in your mouth and less all over the kitchen.
For those of you who have never eaten a pomegranate, the frustration comes from the structure of the fruit and what a pain it is to get to the good stuff. An orange, for example, is easily peeled and the delicious part is right at hand. A pomegranate fruit has several internal chambers filled with seeds that are stuck to a membrane and each other. The seeds are what you want to eat but it’s a huge pain to get them out without crushing them, making a mess, and getting the pile of seeds you’ve scooped out completely covered in white flakes from the membrane.
- The secret? Quarter the pomegranate and then place it into a large bowl of water. Pomegranate seeds sink and everything else—skin, membranes, etc.—float. Brush the seeds free from the skin and membrane and they’ll sink right to the bottom. Check out the full guide and excellent accompanying photographs at the link below
Or
top
21. Deseed a Pomegranate in Seconds Using a Wooden Spoon
- If you don’t love pomegranates, it’s either because you’ve never had one or you hate how much work they take to deseed. While many people recommend peeling it in a bowl of water, it turns out there’s an even faster method: just break it open and bang on it with a wooden spoon. You should have all those seeds in a bowl in about 10 seconds.
- It’s all about the prep. Take away the stress by doing the prep the night or day before. You’ll look like a star.
23. Spices
- Store spices in a cool, dark place, not above your stove. Humidity, light and heat will cause herbs and spices to lose their flavor
- When using fresh herbs such as cilantro or parsley, add whole stems to salads and sandwiches, and chop and stir leaves into salsas and guacamole.
- Fresh basil keeps much better and longer at room temperature with the stems in water.
- Wrapping fresh herbs in paper towel and putting in veggie draw is a good way to dry them.
24. Taste what you make before you serve it.
- It’s amazing that people will follow a recipe but not taste the dish to see if it needs more salt, pepper or spices. I guess that’s blind faith!
- After working with garlic, rub your hands vigorously on your stainless steel sink for 30 seconds before washing them. It will remove the odor. Now personally I like the smell of garlic!
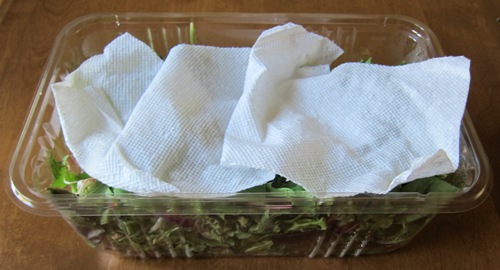
- Prolong the lifespan of greens by wrapping them loosely in a damp paper towel and placing in a resealable plastic bag. That local arugula will last about four days longer.
- I reuse the bags that my 3 pack of Romaine lettuce come in for storage also.
- Ted swears by those green bags
- My wife places a paper towel on top and then closes the container
Use good oil when cooking. Smell and taste it: If it doesn’t taste good alone, it won’t taste good in your food.
- To optimize the juice you get from a lemon or lime, roll it hard under your palm for a minute before juicing.
or
- Microwave it for 10 to 15 seconds.)
top
29. Sandwich spreads
- To make a great sandwich, spread the mayonnaise or whatever condiment you’re using from corner to corner on the bread. People rush this step and just do a swoosh down the middle. Every bite should be flavorful. Now that’s a sandwich!
- Homemade vinaigrettes have fewer ingredients and taste better than bottled ones. No need to whisk them: Just put all the ingredients in a sealed container and shake.
- Take the time to actually read recipes through before you begin. I believe you should make it by the recipe then the next time adjust to your personal likes.
- Recipes are only a guideline, not the Bible. Feel comfortable replacing ingredients with similar ingredients that you like. If you like oregano but not thyme, use oregano.
- Don’t be too hard on yourself
- Mistakes make some of the best recipes! Keep it simple. Now remembering the mistakes is another story.
- Cook more often. Don’t study; just cook.
- Cook with other people who want to learn or who know how to cook.
- Do not use oil in the water when boiling pasta: It will keep the sauce from sticking to the cooked pasta.
- Reserve a little pasta water to put on the pasta before the sauce it helps the sauce something to stick to pasta.
- When you’re browning meat, you should blot the surface dry with a paper towel so the meat doesn’t release moisture when it hits the hot oil. Too much moisture makes the meat steam instead of sear, and you will lose that rich brown crust.
- Make sure the handle of your sauté pan is turned away from you so you don’t hit it and knock it off the stove. It happens all the time.
Salt and pepper a steak and then place in freezer 15-20 minutes before placing on hot grill.
This way the outside grills up nice while the inside stays moist and not over cooked. Adjust time depending on size of steak.
35. Slicing meats and poultry
If you are going to slice, cube or dice meats /chicken for stir fry or whatever you might find it easier to partially freeze before cutting.
36. Knives
Always use sharp knives. Not only is it safer but it will make your work much more efficient.
top
37. How to help blanched or cooked veggies keep their color
- Plunge vegetables in ice water after blanching (boiling) them so they maintain a bright color.
- If you’re cooking cauliflower, add a bit of milk to the water with salt to keep the cauliflower bright white. Shock it in cold water to stop the cooking and then serve.
- Don’t overcrowd the pan when you’re sautéing — it’ll make your food steam instead.
- I like a list and try to stick to it
- Don’t go shopping hungry
- It is OK to go and see what the special is and choose one meal based on that.
- I don’t use coupons much anymore since the kids are out i buy what I like and they just don’t have coupons for that often.
- Turn to the person to your right or left and tell them they are assigned to clean up.
- Clean as you go. (Dorky, but I swear it really helps.)
- By removing the seeds.
- My method is making four straight cuts down the sides. This will create four long slivers, and the cluster of seeds will remain in the center of the chile. The result will be less heat and more great flavor.
- Another is cut in half and then run the back of the knife along the inside of the chile scrapping off the seeds.
My wife gave us a cooking class at Stonewall Kitchen for my birthday and one of the garnishes was crispy shallots.
- They dipped the shallots in rice flower before putting into oil. I asked why rice flower and the answer was it is gluten free and it browns and crisps more quickly.
- I wonder if that would work on onions also.
- Another cooking class tips was they always use unsalted butter. It seems there is no standard for the amount of butter in salted butter so one brand might have more than another. By using unsalted butter you control the amount of salt used. I never knew this I just assumed and we all know when you…….
44. Pound out a chicken breast
• I like to place the chicken between two sheets of plastic wrap that I’ve moistened with a bit of water
• Use a meat mallet
• Starting with the thickest part of the chicken, start to pound on the chicken gently (if you go too hard you may just pulverize rather than flatten the chicken)
• Move each strike slightly; working from the center, out towards the edges of the breast. When you get to the outside, start over at the center and move in another direction
• Repeat that process until you’ve gotten the chicken to the desired thickness
• My friend has a cast iron pan that he uses and I have used one of my nonstick pans in a pinch
45. Start with a glass of Wine – Wendy Saver
46. How to truss a chicken

There are hundreds of ways and every one is correct I just use this methods cause I find it easy.
Start at the back of the chicken, tuck the wings under and tuck the neck cavity flap under. Taking some twine run it across the neck cavity along the groove where the thigh and body meet bringing it under the end of the drum stick crossing left to right bringing it to the top pulling the legs together and tying a knot. The uniform shape insures more even cooking.

Steve! You R inspiring! thanks for all these tips. I’m bookmarking your site so I can keep educated and inspired. Keep on acooking.
Best,
Ron
Thanks Ron, I’ll try not to disappoint always trying something new.