Crunchy Roasted Brussels Sprouts

Crunchy Roasted Brussels Sprouts

When I was younger oh so much younger than today, sorry could not resist, I did some landscaping on Cape Cod. For those of you familiar with the cape, back then it was very much a summer vacation area and one of the functions we would provide was a nice garden full of those fresh vegetable and such for the owners to enjoy during the summer. One thing we always put in was Brussels sprouts, knowing that it was a September harvest and who would be enjoying these long after the residents were gone for the winter and we came back for our promised turning of the soil etc. etc. There were other crops but this is about the sprouts just the sprouts.


Ingredients

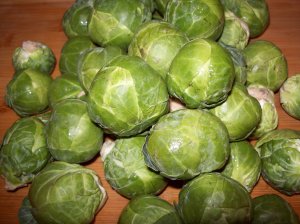
  • About 3 pound Brussels sprouts
  • Olive oil
  • Salt and pepper
  • Lemon juice 1-2 Tbsp.
  • Poppy seeds 1 tsp.
  • Lemon zest


How

Preheat the oven to 450.

Clean up the Brussels sprouts cutting off the ends and removing the outer leafs.

In a shallow baking dish or roasting pan, toss the sprouts, olive oil, salt and pepper until combined. Roast, stirring occasionally, 15 to 18 minutes.

Sprinkle with the poppy seeds and add lemon juice and toss just before serving.

Garnish with lemon zest.

A variation I have done is cutting the sprout in half then following the steps above.

Brussels sprouts – Wholefoods.com

What’s New and Beneficial About Brussels Sprouts

  • Brussels sprouts can provide you      with some special cholesterol-lowering benefits if you will use a steaming      method when cooking them. The fiber-related components in Brussels sprouts      do a better job of binding together with bile acids in your digestive      tract when they’ve been steamed. When this binding process takes place,      it’s easier for bile acids to be excreted, and the result is a lowering of      your cholesterol levels. Raw Brussels sprouts still have      cholesterol-lowering ability — just not as much as steamed Brussels      sprouts.
  • Brussels sprouts may have unique      health benefits in the area of DNA protection. A recent study has shown improved      stability of DNA inside of our white blood cells after daily consumption      of Brussels sprouts in the amount of 1.25 cups. Interestingly, it’s the      ability of certain compounds in Brussels sprouts to block the activity of      sulphotransferase enzymes that researchers believe to be responsible for      these DNA-protective benefits.
  • For total glucosinolate content,      Brussels sprouts are now known to top the list of commonly eaten      cruciferous vegetables. Their total glucosinolate content has been shown      to be greater than the amount found in mustard greens, turnip greens,      cabbage, kale, cauliflower, or broccoli. In Germany, Brussels sprouts      account for more glucosinolate intake than any other food except broccoli.      Glucosinolates are important phytonutrients for our health because they      are the chemical starting points for a variety of cancer-protective      substances. All cruciferous vegetables contain glucosinolates and have      great health benefits for this reason. But it’s recent research that’s      made us realize how especially valuable Brussels sprouts are in this      regard.
  • The cancer protection we get from      Brussels sprouts is largely related to four specific glucosinolates found      in this cruciferous vegetable: glucoraphanin, glucobrassicin, sinigrin,      and gluconasturtiian. Research has shown that Brussels sprouts offer these      cancer-preventive components in special combination.
  • Brussels sprouts have been used to      determine the potential impact of cruciferous vegetables on thyroid      function. In a recent study, 5 ounces of Brussels sprouts were consumed on      a daily basis for 4 consecutive weeks by a small group of healthy adults      and not found to have an unwanted impact on their thyroid function.      Although follow-up studies are needed, this study puts at least one large      stamp of approval on Brussels sprouts as a food that can provide fantastic      health benefits without putting the thyroid gland at risk.
Advertisement
One thing to do with butternut squash when on sale

One thing to do with butternut squash when on sale

One of my fall favorites, Butternut Squash and Apple Soup then there is plain roasted, fries, replace sweet potato, mashed with a little butter and brown sugar, the list goes on. So when I saw that sale sign and a huge basket of butternut and acorn squash it was another case of my eyes were bigger than my menu. I had some room in the freezer so I did not panic just a quick blanch and freeze.

Mature winter squashes like the butternut have tough skin that protects their firm, yellow-orange flesh and allows them to last longer than their fleeting summer squash relatives. A butternut is so self-reliant that it doesn’t even need to be refrigerated, and can be stored in a cool dark place for several weeks. So how do you choose a good one? First, pick it up. It should be heavy for its size. Look it over and make sure its skin is firm and free of bruises. Check for brown frostbite scars, which can affect the squash’s texture and longevity, and punctures or cuts, which can let bacteria in and cause mold. I like to choose one with a longer neck, especially if I am cubing make life easier. www.cookthink.com

Ingredients

Butternut squash (Quantity depends on you)


How

Cut ends on and peel and scrap seeds out

Cut the squash into 1/2-inch cubes.

In a larger pot bring at least 8 cups of water to a full boil


Blanch the squash for about 3 minutes

Strain the squash in collider and then immediately put in large bowl of ice water to stop cooking

Place on a large cookie sheet and into the freezer until frozen about 30 minutes to an hour.

Place in freezer bag (we use Food Saver), suck it and back into the freezer.

Butternut squash is an edible member of the gourd family whose roots have been traced back to Mexico in 5500 B.C. (Along with beans and corn, squash is one of the “Three Sisters,” the cornerstones of Native American cuisine.)

A mature winter squash, it grows on a vine, and has a giant pear-shaped body, tough skin, rich-tasting, vivid yellow-orange flesh and a sweet flavor. (It can often substitute well for the sweet potato.) Butternut squash can be baked, steamed, puréed or simmered, and is often referred to by cooks as a “workhorse” because of its versatility. Once cooked, its dry flesh has a glossy and silky texture that makes it a favorite in soups, curries and other dishes. http://www.cookthink.com


The word “squash” comes from the Narragansett word that means “to eat raw or green.” You certainly won’t be eating your squash raw or green, and you must cook it even before you freeze it to make sure that the squash retains its color and texture once it is thawed. The process of cooking squash is called blanching. When you blanch squash, you boil it just long enough to stop the enzymes that cause squash to deteriorate. The process for preparing and blanching squash for freezing depends on whether you are freezing summer or winter squash. http://www.livestrong.com

Bacon, Lettuce, Tomato and Jerod Mayo Sandwich

Bacon, Lettuce, Tomato and Jerod Mayo Sandwich

Jerod Mayo was drafted by the New England Patriots in the first round (10th overall) of the 2008 NFL Draft … Signed by the Patriots (7/24/08). This Thursday we play the Jets again we need him to play as he did the first meeting with I believe 11 Tackles – 10 Solo and 1 Assist and caused 1 fumble. He hits often and hard, maybe too hard sometimes. Here is a sandwich that hits you hard in a good way. This came from Scup’s In the Harbor the restaurant my sister and her husband used to own and operate in east boston, now they live on the opposites coast in Washington state but still root for the patriots. We even Skype some of the games for them if not on national TV. They are still keeping some stuff a secret so I had to wing it, gee my own sister go figure. Kind of like your Mom a little of this and handful of that.


Oh if you want a Thanksgiving Day recipe try my Buttermilk Marinated Turkey but marinated at least 8 hours or overnight turning once start breast side up.


Ok It’s half time let’s eat!

Bacon, Lettuce, Tomato and Jerod Mayo Sandwich

Ingredients

  • 2 slices of Grilled Italian Bread
  • Romaine lettuce
  • Oven roasted cherry or grape tomatoes sliced in half length wise. (Roast at 450 for about 10-15 minutes) – You do not have to roast them if you do not want to or just can’t wait.
  • Crispy Smoked apple wood “thick” bacon
  • Sliced cheddar (optional)

Basil Mayo ( this is my recipe not theirs, secrets you know)

  • Whisk all ingredients together
  • 1 cup good mayonnaise
  • 10 to 15 basil leaves, chopped
  • 1 teaspoon kosher salt
  • 1/4 teaspoon freshly ground black pepper
  • 1 teaspoon freshly squeezed lemon juice
  • 1 tablespoon good olive oil
  • 1 teaspoon minced garlic

Serve:

Make sandwiches cut in half and stake on platter or serve all ingredients on a platter and have a build your own sandwich.

The Ultimate BLT


Wendy says: I Hope Mr. Mayo enjoys his namesake sandwich.


Alternative sauce chili-mayonnaise


nepatriotslife life Mayo mentions

Video: Mayo goes down with shoulder injury.

Video: Jerod Mayo hates Tom Curran from CSNNE

Revitalizing The Dynasty Defense

***************************************************************************************************************************************************************************************************

Boston Magazine 8-2009

Scup's in the Harbor

We admit it’s tough to make a bad BLT (there is bacon in there, after all). But it’s a genuine challenge to ace every element—crisp strips of meat, sweetly ripe tomato, lettuce with just the right crunch—and elevate this humble sandwich to warm-weather classic. Scup’s in the harbor rises to the occasion with cherry wood–smoked bacon and roasted cherry tomatoes nestled on red leaf lettuce. Sliced cheddar and a spot of pesto mayo add zing and texture without overpowering the key players, and sturdy slices of toasted wheat keep hands clean and flavor at the fore. Boston Magazine 8-2009


Lyn’s Cranberry Compote

Lyn’s Cranberry Compote

Cranberry sauce is something we love and every year we try another recipe this year a repeat, one we tried way back in 2002 from YankeeMagazine recipe and liked. With our own twist of course.

Yield: 18-20 servings

This tangy cranberry compote is a great way to refresh your taste buds mid-meal.

Ingredients

  • 1 cup dried cranberries (you can substitute raisins)
  • 1 12-ounce package cranberries
  • 1 cup maple syrup (or sugar)
  • 1/2 teaspoon salt
  • 1/2 teaspoon cinnamon
  • 1/2 teaspoon ground ginger
  • 1/4 teaspoon allspice
  • 1/8 teaspoon ground cloves
  • 3/4 cup cider vinegar
  • 1 tablespoon grated lemon peel
  • 1/4 cup orange juice
  • 1/4 cup water
  • Garnish: orange zest

How

In a large saucepan over medium heat, combine all ingredients. Cover mixture and cook 20 minutes, stirring occasionally. Cool in pan. Transfer to a glass jar with an airtight lid, cover, and refrigerate. When ready to serve, pour compote into a serving dish and garnish with orange zest.

Make Ahead Gravy

A stainless steel gravy boat.

I ask you, what else can you make ahead?

We are doing whole berry cranberry sauce also.

After Tday I will post more pictures

Ingredients

  • 1/2 cup minced onion
  • 1 medium clove garlic, minced
  • 2 cups canned chicken broth
  • 3 tablespoons flour
  • 1/4 cup apple juice or cider
  • 1 tablespoon lemon juice
  • 1/2 cup evaporated skim milk
  • 1 teaspoon Gravy Master
  • 1 teaspoon finely minced fresh rosemary or 1/2 teaspoon dried
  • 1/4 teaspoon dried thyme, crushed
  • salt and pepper
  • 3 tablespoons turkey drippings Add at end after you cook turkey and reheat gravy

How

1 day ahead: In a medium saucepan over medium heat, sauté onion and garlic in 3 tablespoons chicken broth for 4 minutes. Add flour and stir 1 minute. Slowly add the rest of the broth, stirring constantly. Add apple juice, lemon juice, evaporated milk, Gravy Master, rosemary, thyme, salt and pepper. Bring to a boil, and then reduce heat to low and simmer 10 minutes, until thickened slightly. Remove from the heat and place in a blender. Pulses 30 seconds on liquefy. Place in a covered container and refrigerate.

Next Day: Half an hour before serving, place gravy in a saucepan over low heat. Whisk in 3 tablespoons turkey drippings and simmer on low, stirring occasionally, until serving.

Make Ahead Grvy Ingredients    100_1076100_1077      100_1079

Buttermilk-Marinated 1/2 Turkey with Caramelized Onion Gravy – Trial Run

Buttermilk-Marinated 1/2 Turkey with Caramelized Onion Gravy – Trial Run

About 2 weeks ago whiles cooking, I was turned and asked Lyn, I wonder how turkey would be marinated in buttermilk. I had used butter milk with many of my chicken dishes and always love the results, tender and juicy. So why not Turkey, let’s try it for Thanksgiving. She smiled and said that is a good idea but I hate to try an experiment on that day why not try it first. I personally feel she was secretly hoping I would get discourage and go with a beef tenderloin roast. I did not. I “Googled” turkey and buttermilk and was surprised that others had beat me to it, I was not the genius I thought.  Armed with their ideas we marched to Wholefoods because they were the only ones who had a half turkey before the big day. With half a turkey and a quart of butter milk in my arms I was happy as live turkey after thanksgiving something new to try.

Ingredients:

  • Half (1/2) fresh or thawed frozen turkey (about 6-7 lbs)
  • 1 tablespoon hot sauce, such as Tabasco
  • salt and pepper
  • 1 quart buttermilk
  • 2-3 tablespoons of olive oil
  • 1 tablespoon of butter (optional)
  • 1 tablespoon vegetable oil to rub the turkey with
  • 3 onions, chopped
  • 3 cloves garlic, chopped
  • 2 tablespoons flour
  • 2 cups reduced-sodium chicken broth
  • Touch of gravy master

How:

Wash and pat dry the half turkey. Place the turkey, breast side up, in an oven-roasting bag.

Add the hot sauce, 1 tsp. salt and 1 tsp. pepper to the buttermilk container; shake to combine.

Pour the buttermilk mixture over the turkey. Seal the bag, transfer to the refrigerator and let marinate, turning the turkey over once, for at least 4-5 hours. I suppose you could do it over night.

Remove the turkey and pat dry inside and out. Rub the skin with 1 tbsp. oil; season with salt and pepper. Let rest at room temperature.

Preheat the oven to 400 degrees . Tuck the wings behind the back of the turkey. Place the turkey, breast side up, on a rack set in a large roasting pan. Roast, basting once with the pan juices, for 1 hour. Lower the heat to 350 degrees and roast, basting every half hour, until an instant-read thermometer registers 155 degrees when inserted into the thigh, 1 to 1 1/2 hours more. If the turkey is over browning, tent with foil. Remove from the oven, tent and let rest for 30 minutes.

Gravy

While this is cooking

In a large pan, heat the remaining oil over medium heat, add optional butter. Add the onions, garlic, 1/2 tsp. salt and 1/4 tsp. pepper and cook, stirring frequently, until soft and browned until caramelized, about 35-45 minutes. Add the flour cook, stirring constantly, for 1-2 minutes. Add 1/2 cup chicken broth and cook, stirring, until thickened. Add the remaining 1 1/2 cups broth and bring to a boil. Stir in a touch of gravy master. Lower the heat and simmer for 5 minutes. Serve the gravy with the turkey. I was lazy but a nice touch might be to blend the end results together.

Note: The skin was nicely colored, crisp and tasty the meat was really juicy and tender even the breast.

****************************************************************************************************************

Originally, buttermilk was the liquid left over from churning butter from cultured or fermented cream. Traditionally, before cream could be skimmed from whole milk, the milk was left to sit for a period of time to allow the cream and milk to separate. During this time, naturally occurring lactic acid-producing bacteria in the milk fermented it. This facilitates the butter churning process, since fat from cream with a lower pH coalesces more readily than that of fresh cream. The acidic environment also helps prevent potentially harmful microorganisms from growing, increasing shelf-life. However, in establishments that used cream separators, the cream was hardly acidic at all.

Ridley Believe it or not Nachos

Ridley Believe it or not Nachos

Growing up my son Mike’s specialty was nacho’s he always threw together the best nacho’s ever. When it hit the table we just dove in like a fumble recovery. So I present my version of his Nachos for NEpatriotslife.com game day recipe. I do him no justice.

Did you know Howard Cosell made a huge impact on nachos acceptance to the mainstream!

Do you know who Howard is?

 Ingredients:

  • 1 pound ground beef, chicken or turkey
  • 1 (1.25 ounce) package taco seasoning mix
  • 3/4 cup water
  • 1 (18 ounce) package restaurant-style tortilla chips
  • 1 cup shredded extra sharp Cheddar cheese, or more to taste
  • 1 (15.5 ounce) can refried beans
  • 1 cup salsa
  • 1 cup sour cream, or more to taste
  • 1 (10 ounce) can pitted black olives, drained and chopped
  • 4 scullion onions, sliced thin
  • 1 (4 ounce) can sliced jalapeno peppers, drained

How:

Cook and stir ground beef or whatever- if chicken or turkey add a little olive oil to brown,in a skillet over medium heat until meat is crumbly and no longer pink, 5 to 10 minutes. Drain excess grease. Stir in taco seasoning mix and water and simmer until beef mixture has thickened, 8 to 10 minutes.

Set the oven rack about 6 inches from the heat source and preheat the broiler. Line a baking sheet with aluminum foil.

Spread tortilla chips on the prepared baking sheet; top with Cheddar cheese and dot with refried beans and ground beef mixture.

Broil in the preheated oven until cheese is melted, watching carefully to prevent burning, 3 to 5 minutes.

Top nachos with salsa, sour cream, black olives, green onions, and jalapeno peppers

*********************************************

Howard Cosell: Nachos ultimate champion!!

Now here is where the story gets even better. The tasty snack becomes a specialty in many restaurants in Southern Texas but is virtually unknown anywhere else on the planet. That is until a gentleman by the name of Frank Liberto decided to try to sell the stuff as a concession stand item! He changed up the recipe by reformulating the cheese to be soft all the time and using simple tortilla chips. He began to sell his new version of nachos in 1977 in Arlington Stadium in Arlington Texas. but what really made the concept take off was a visit by “Monday Night Football” later that year. Before the game started they were offering the product in the reception area where Howard Cosell took a liking to the name. That night and for weeks after, Cosell and the rest of the “Monday Night Football” team worked the word nacho and the product itself in wherever they could! From there on out nachos quickly grew into the massive force they are today!!

Lyn’s Almond Butter Cookies

Lyn’s Almond Butter Cookies

I know she got these out of a natural health magazine many years ago and that these are good, real good, that’s all I will write. Smell the almond.

About 3 1/2 dozen cookies

Ingredients

  • 24 whole almonds
  • 2 cups unbleached all-purpose flour
  • 1/8 teaspoon baking powder
  • 1/4 teaspoon sea salt
  • ½ cup maple syrup
  • 2/3 cup almond butter
  • 6 tablespoons unsalted butter, melted
  • 1 teaspoon vanilla extract
  • ½ teaspoon Vanilla extract
  • ½ teaspoon almond extract
  • 1 teaspoon finely grated orange zest.


How

Preheat the oven to 350°. Lightly grease 2 backing sheets

Blanch the almonds in boiling water for 45 seconds. Drain and rinse under cold running water, squeeze each almond to pop it out of its skin; transfer almonds to cookie sheet and toast in the oven for 8 minutes.

Sift the flour, baking soda, and salt together in a bowl.

In another bowl, whisk together maple syrup, almond butter, melted butter, vanilla and almond extracts and orange zest until smooth.

Fold the flour mixture into the almond butter mixture.

Form the dough into walnut sized balls. Place the balls 3 inches apart on the backing sheet and gently flatten into 1 ½ inch rounds. Press an almond into each cookie. Bake for 15 to 18 minutes, rotating the baking sheets halfway through for even baking. Transfer the cookies to a wire rack to cool until crisp.

***************************

Is this true?

Almonds are not nuts.  In fact, an almond is the seed of the fruit of the almond tree.  This tree bears fruits with a “stone-like” seed within.

Fruits with these characteristics are called “drupes”.  Specifically, a drupe is a fruit that has an outer fleshy part surrounding a shell that contains a seed.  Other drupes include fruits from walnut trees and coconut trees.

The seed inside the almond fruit is what is commonly referred to as an almond “nut”, even though it’s not a nut.  A nut is a hard shelled fruit that has an indehiscent seed; more simply, a hard shelled fruit that doesn’t open to release its seed(s).  An example of a true nut would be an acorn or chestnut.

This all gives a whole new perspective to the famous Almond Joy jingle “Sometimes you feel like a nut; sometimes you don’t”.  When you feel like a nut, an Almond Joy wouldn’t do you any good due to the ingredients primarily comprising of chocolate (bean), coconut (seed), and almonds (seed).  The ending of the jingle, like so many advertisements, is then just plain false advertising: “Almond Joy’s got nuts” (LIES!!!), “Mounds don’t”.

Read more at http://www.todayifoundout.com/index.php/2010/04/almonds-are-not-nuts/#SMiq8OzorPKfmDkT.99

Mimi Chili

Mimi Chili

Every once in a while I come home from work and there is a package sitting there beside the garage door with the return address of Maine on it. A smile grows across my face I know that it is a special treat from Lyn’s sister, Mimi. This time is was chili packed with just the right amount of freezer bags keeping it a perfect temp and ready to heat up. I asked her for the recipe and as she says it kind of hard I just sort of throw it together but here ya go! So I give you a totally buildable recipe that I know I have enjoyed for years. What about some of that spinage bread?? Take some pictures while you make it and I’ll post with your permission ofcourse.

 Ingredients

  • 1 lb to 1 1/2 lb. Hamburg
  • 1 big can Cento Crushed tomato
  • 1 big can Hunt’s Sauce
  • 1 can Stewarts shelled beans
  • 1 can Bush’s black beans
  • 1 can Bush’s dark red kidney bean
  • 1 bag frozen diced green peppers
  • 1 can Hunt’s tomato paste
  • Frozen corn
  • 1/2 bag frozen diced onions
  • Old El Paso Chili mix
  • Weber’s Grill Master’s Hamburg seasoning to taste
  • cumin
  • chili powder
  • onion powder
  • garlic powder
  • basil
  • cilantro
  • salt & pepper

How

Heat in pan, add Old El Paso Chili mix, spice with cumin, chili powder, onion & garlic power, basil, cilantro salt & pepper to taste. 1 can Stewarts shelled beans, 1 can Bush’s black beans, 1 can Bush’s dark red kidney beans. In frying pan brown hamburg, season with salt & Weber’s Grill Master’s Hamburg seasoning to taste. Strain and add to chili pot. Add 1 can Hunt’s tomato paste to chili w/ little water if chili too thick. Add some corn to it if you like, as always season to taste with spices & hot sauce.

**********************************

Cumin

An aromatic spice with a distinctive bitter flavor and strong, warm aroma due to its abundant oil content. Cumin “seeds” are actually the small dried fruit of an annual plant in the parsley family. Native to the Mediterranean, cumin is hotter to the taste, lighter in color, and larger than caraway, another spice it’s sometimes confused with. Sold whole or ground, the seeds come in three colors: amber, white or black. Amber is most widely available, but the black has such a complex flavor it should not be substituted for the other two. Cumin is a popular ingredient in Middle Eastern, Asian, Mediterranean and Mexican cuisines, and is one of the main ingredients in curry powder.

How to store: Store in an airtight container and place in a dry, cool area, away from light. Flavor and aroma can be retained for up to six months.

Matches well with: beans, chicken, couscous, curry, eggplant, fish, lamb, lentils, peas, pork, potatoes, rice, sausages, soups, stews, eggs

Crockpot Beef Stew with Red Wine

Crockpot Beef Stew with Red Wine

I love when the temps turn to sweatshirt weather, a time when your cheeks get that slight wind chill burn when you’re out for a walk. Work is located downtown and I walk 2 miles every lunch time to keep in shape, get some fresh air but mostly just to clear the head. I have come up with many solutions to the days pressing issue while walking. I’m and IT guy with 35 or so users spread out in 5 locations with an additional 6 servers/PCs to service. To top it off sales is on the road here and in Asia a lot of the time. So every call I get it is 99.99% chance of being issue call. As anyone in my situation will tell you every caller does not give a _____ about anyone else problems just theirs. Oh yeah you take care of the president first, no matter what.

Anyway back to my daily walks, some of the shop owners, police and the mentally challenged give me the nod as I walk by with ear buds blocking out the sounds of downtown Milford and the local neighborhood. I have become a townie it has been since I was in my teens that I’ve been there. Different town different times.

Lyn and I finally broke down and bought a new crockpot, one that you can put the pot on the burner and brown saving those great little flavor bits on the bottom. With sweatshirt weather there is nothing better than coming in from outside and smelling the rich flavors of a great beef stew, heck even a bad one smells good.  As promised here is that quick beef stew recipe I made. I made a small batch since I am still on the fend for yourself diet but made sure I had left overs.


Ingredients

  • 1 pounds stew beef like bottom round, well trimmed and cut into 2-inch pieces
  • 1 cup all-purpose flour
  • ½ tsp. ground pepper
  • *********
  • Pinch or two of red hot pepper flakes
  • 1-2 Tbsps. olive oil (plus more if needed)
  • 1 medium to large onions, ruff chop
  • ¼ cup ketchup – I did not have tomato paste that would probably be about 1-2 Tbsps.
  • 1/2 cup dry red wine
  • 1 large potato, cut into 2-inch pieces
  • 1 cup bay carrots
  • ¼-1/2 cup chicken broth would have been better with beef broth but again I did not have.
  • 1 teaspoon kosher salt
  • ¼ teaspoon dried thyme leaves
  • 1 bay leaf
  • *********
  •  ¼-1/2 cup frozen peas put in when almost ready to serve
  • ¼-1/2 cup frozen corn put in when almost ready to serve


Directions

1. Coat the beef in the flour and pepper. I like to put in plastic bag and shake to coat. Heat a few tablespoons of the oil in a crockpot pot over medium-high heat. Brown the meat, a few pieces at a time, adding more oil as necessary. Remove and set aside.

2. Add the onions to the skillet and cook over medium heat until tender, about 5-10 minutes. Stir in the ketchup and coat the onions. Remove and set aside.

3. Place pot in crockpot, pour the wine into the pot and scrape up any browned bits. Stir in the potatoes, carrots, broth, salt, thyme, red pepper flakes and bay leaf.

4. Cover and cook on low heat for 7 ½-8 hours, or on high for 4 hours. Add the peas and corn and heat through.

I was nervous because it was a small batch but it came out pretty darn good.

My pictures did not come out that great so I admit it I borrowed one from the web. Thanks Susie Cushner interestingly enough her recipe was real close to what I did. Our gut instincts must be close.