Greek Chicken Gyros

Greek Chicken Gyros

Lyn texted me that this look good, so I took a look and said to myself how could I not.

Thanks to The modern Nonna for the inspiration. Chicken Gyros and I actually go way back. Although I am Bulgarian 🇧🇬, my family and I lived on the Island of Crete for many years following my Dad’s Olympic career in water polo. While living there, I experienced true Greek 🇬🇷 home cooking. My mom learned how to make authentic Greek dishes from the women in Greece, which inspired most of the Greek dishes I cook and share on my page.

Me again: Many years ago while I lived in Chicago there was a restaurant down the street that introduced me to Gyros in fact one Thanksgiving he treated me to one since I was stuck alone in town.

The word “gyro” (as in the Greek dish) is typically pronounced “YEE-roh” or “YEE-rohs” (with the “s” indicating plural), while the word “gyro” (as in a gyroscope) is pronounced “JAHY-roh (This is the way most sub shops pronounce it here, so I quickly change to this when I get the puzzled look.)

What is a Gyro?

A Greek Gyro, or simply “Gyro,” is a popular Greek 🇬🇷 dish made of seasoned meat (often beef, lamb, pork, or chicken) cooked on a vertical rotisserie. The meat is then thinly sliced and served wrapped in warm pita bread, with toppings such as tomato 🍅, onion, and tzatziki sauce – a creamy yogurt and cucumber sauce. Sometimes, Gyros also include lettuce, French fries 🍟, or other veggies.

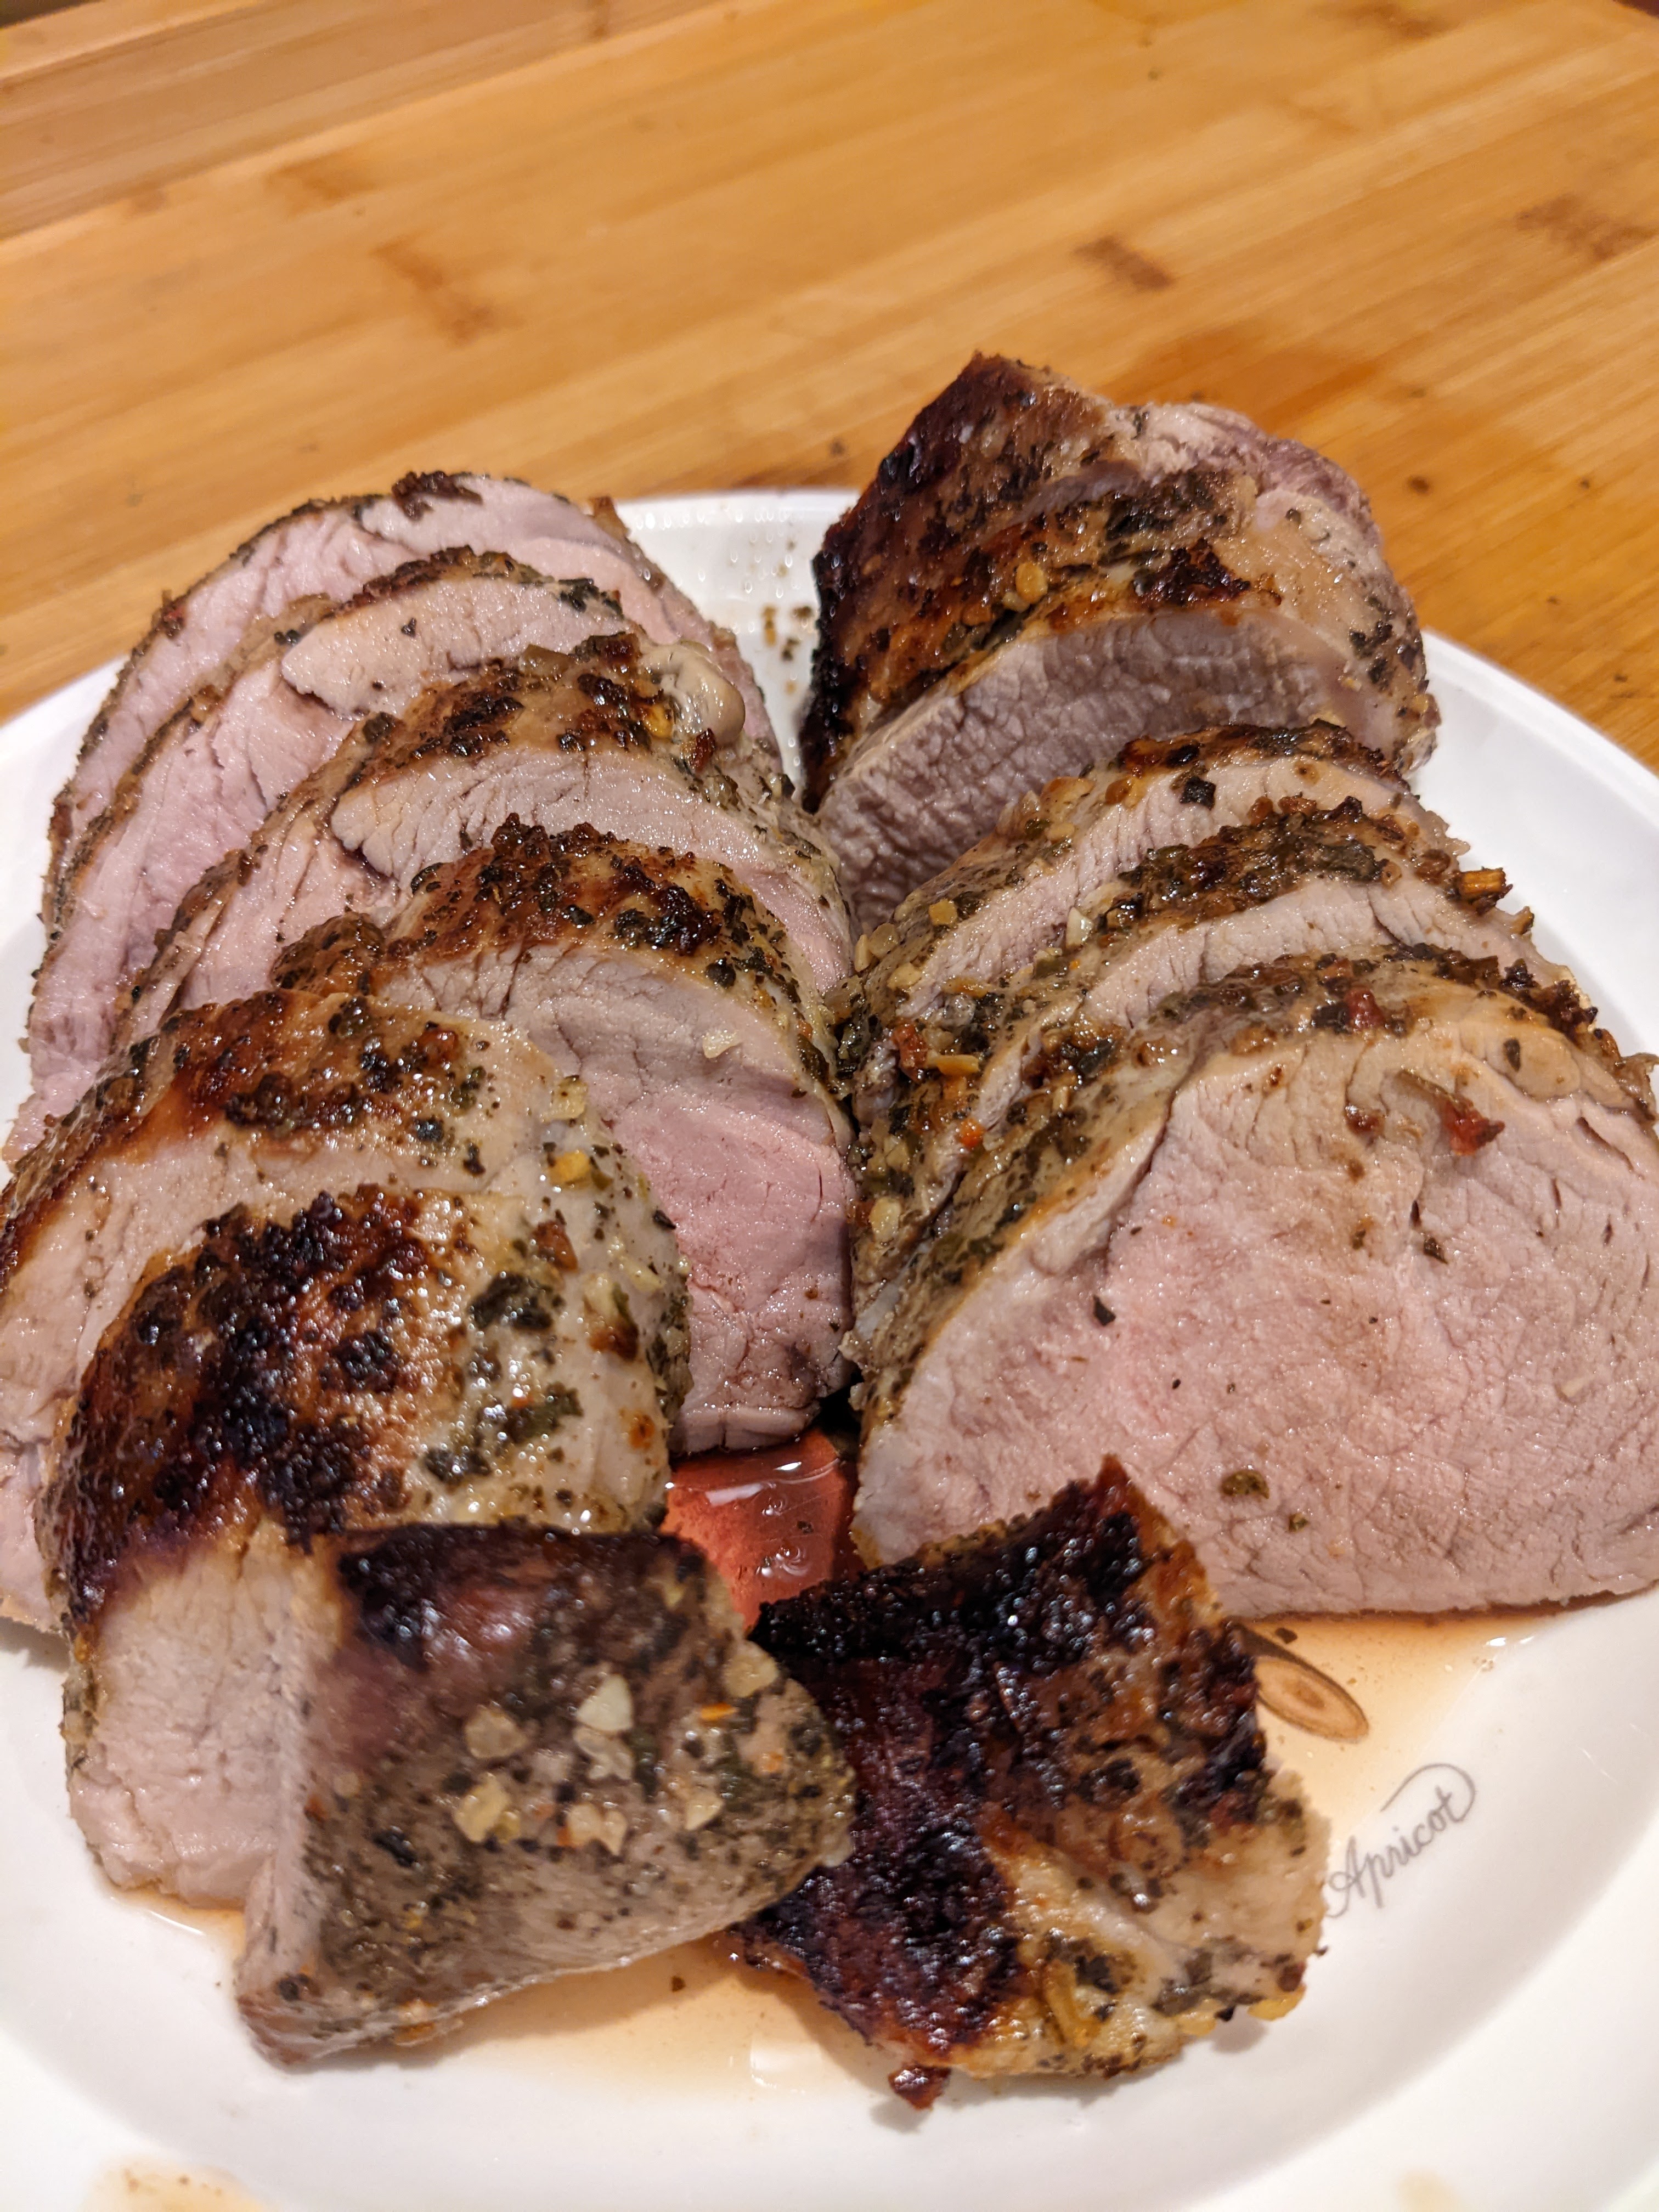
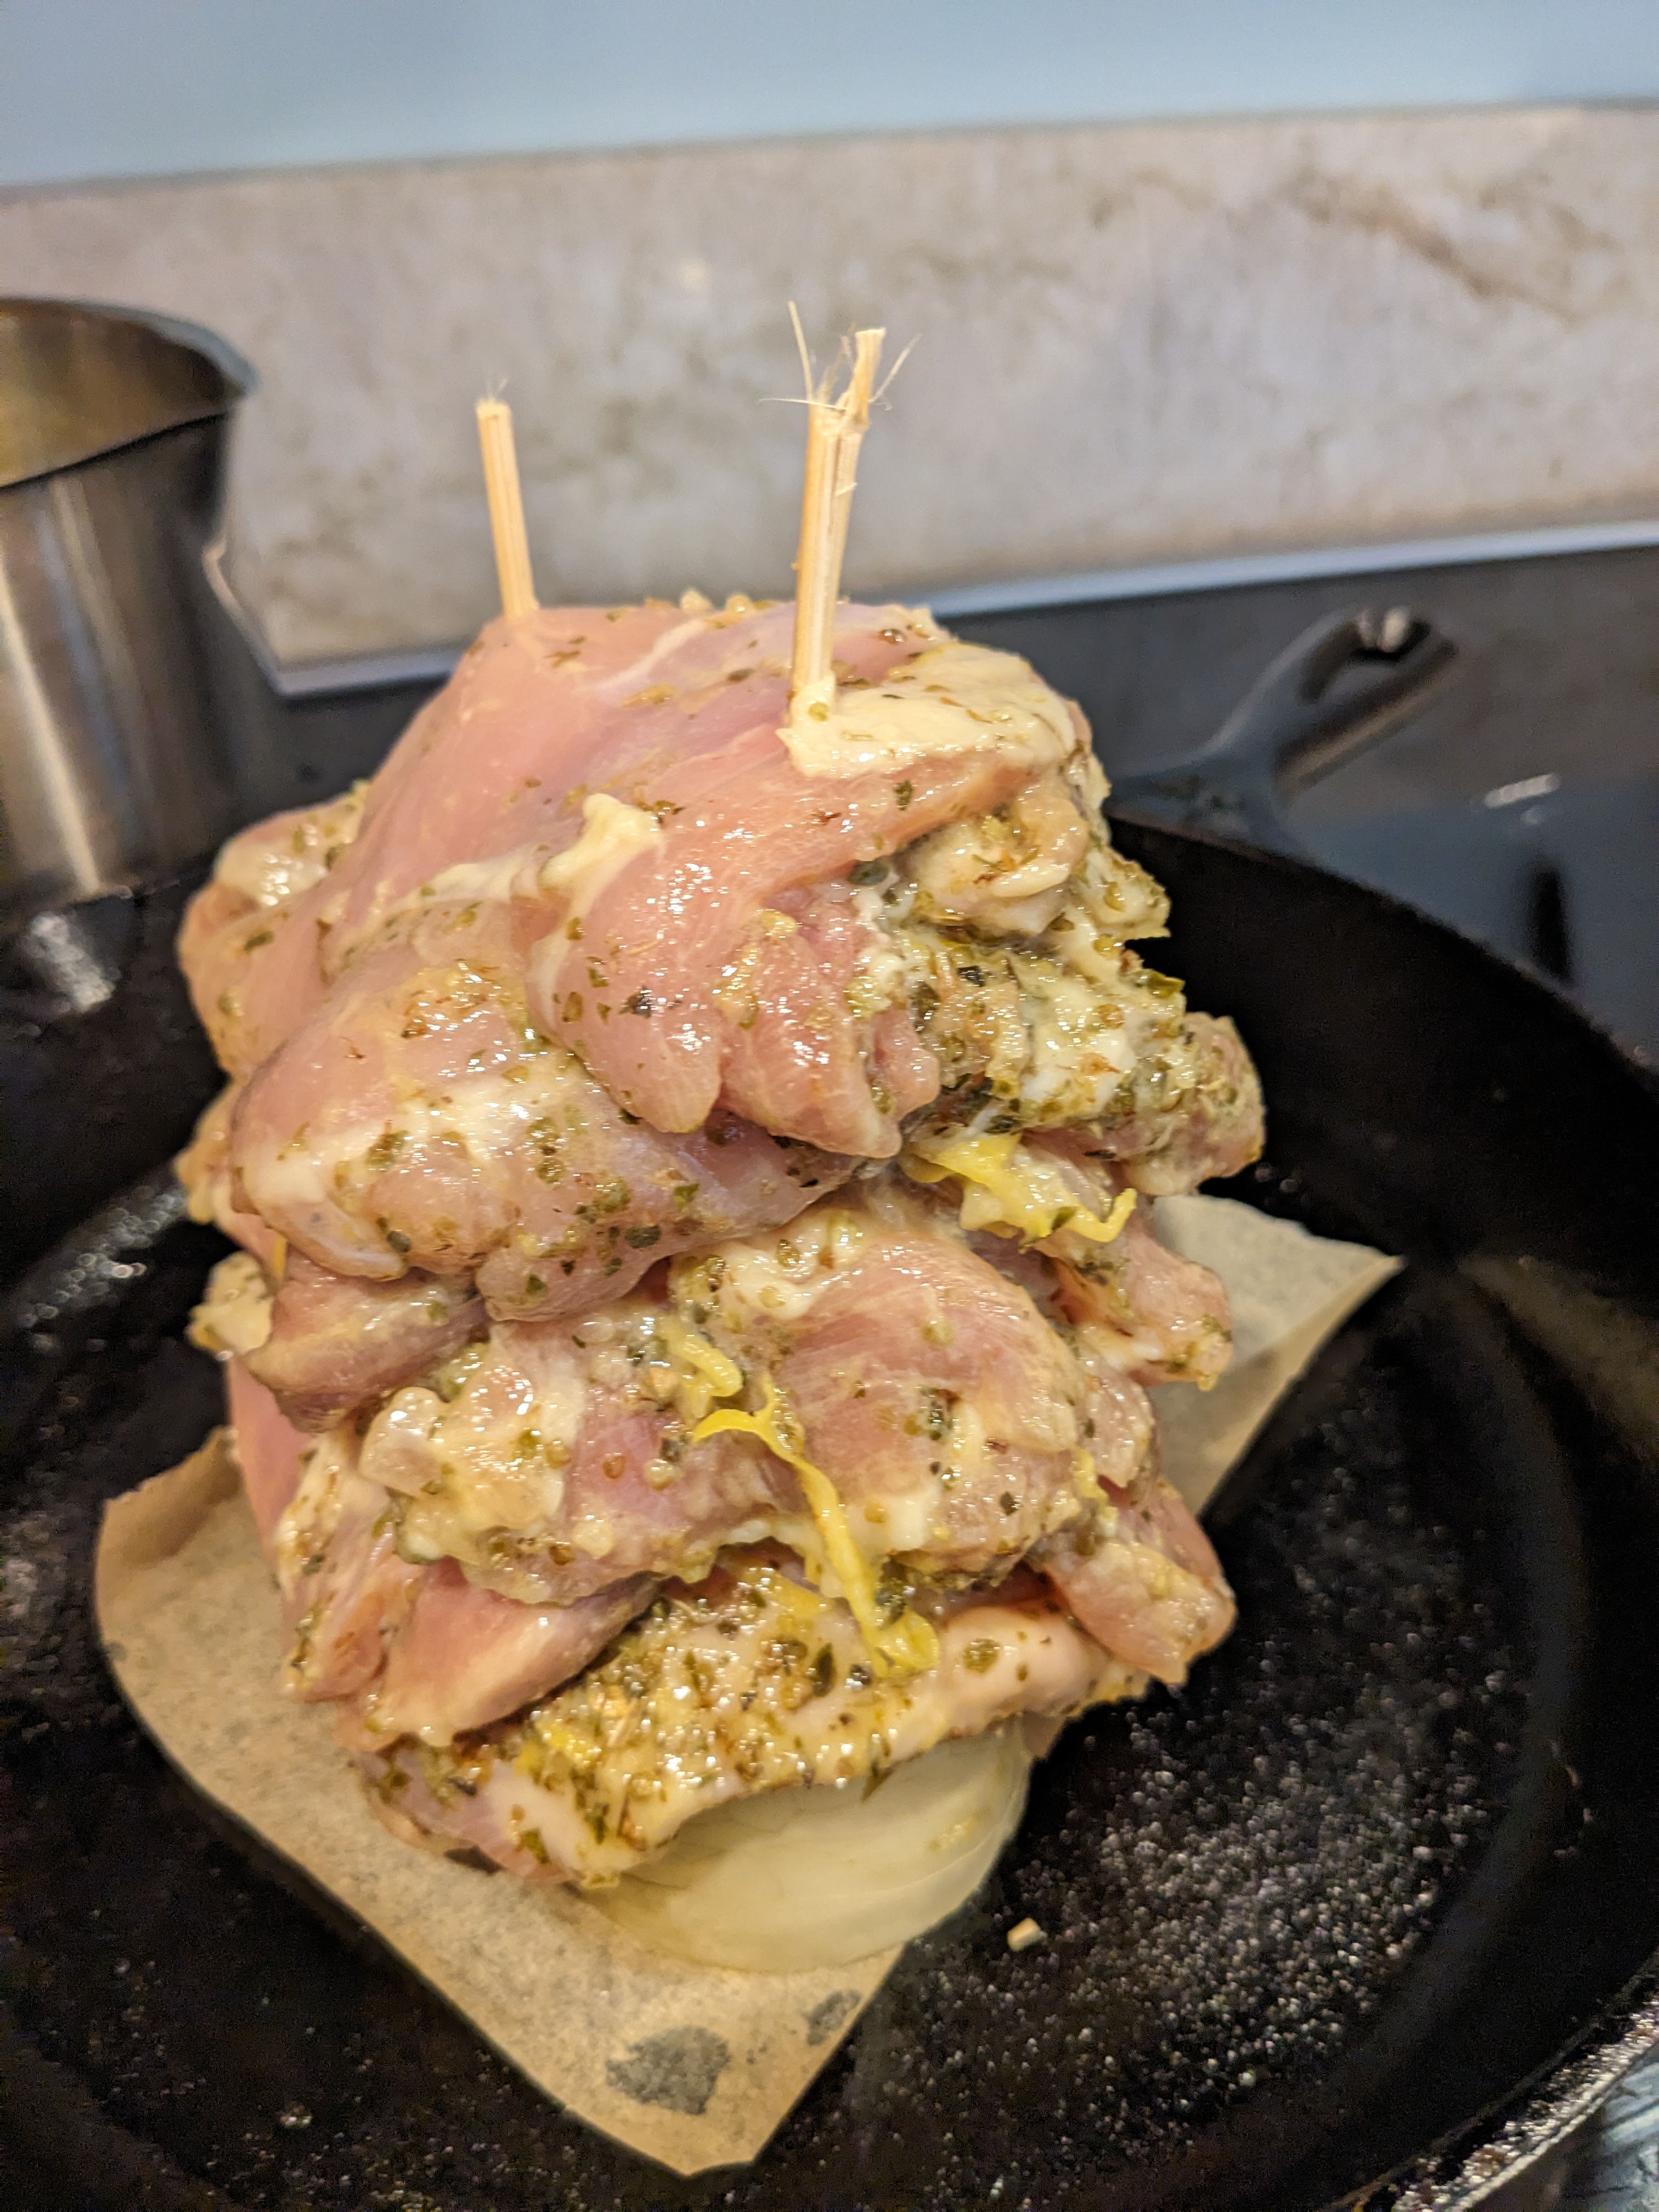
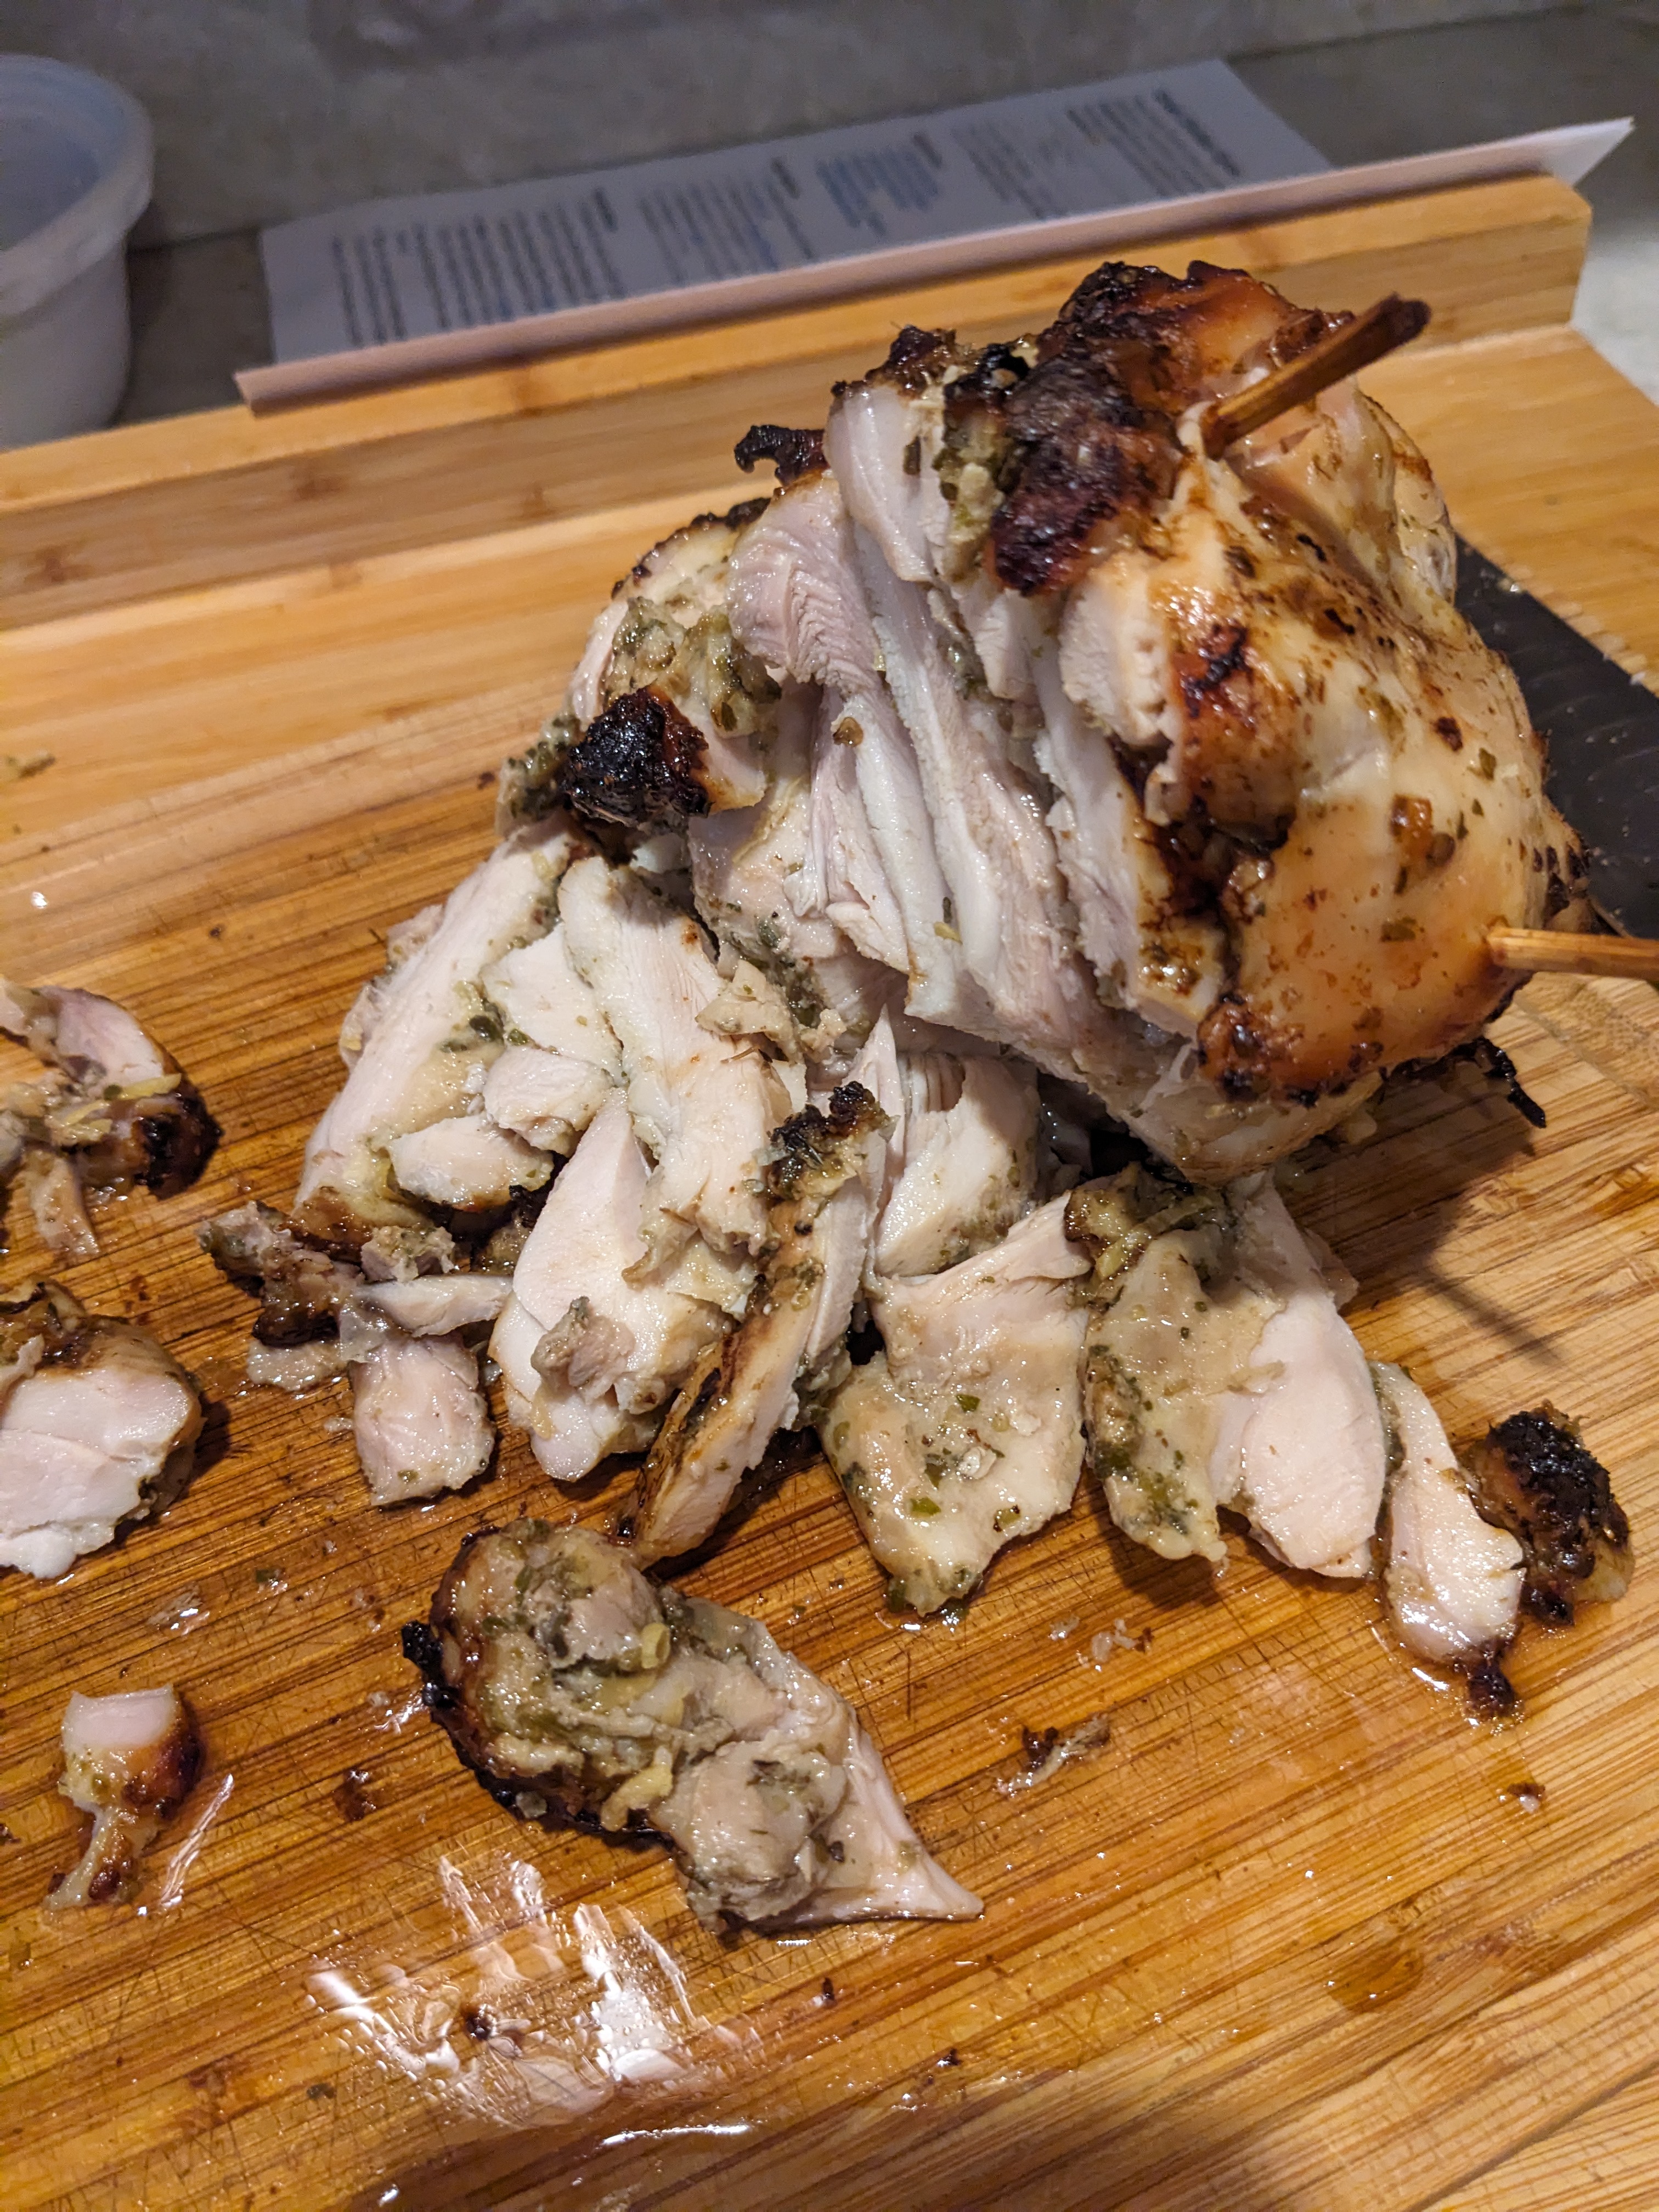
I did not have a Gyro pan so I used the onion trick- it fell over towards the end but I got it to stand up again.

Why You’ll Love Greek Chicken Gyros

Nonna: When I say this is the juiciest 💦 chicken that will ever grace your mouth, I mean it! Juicer than girl’s night gossip, these Greek Chicken Gyros are meticulously seasoned and roasted to perfection. The chicken is marinated in a combination of savory, tangy and herbaceous flavors, stacked on a spit and slow-roasted until the exterior develops a slight caramelized char while the inside remains tender and succulent 🤤. Serve this Greek Chicken Gyro on a warm pita with creamy tzatziki or on top of a salad or bowl – I promise you, you’ll never want to make chicken thighs any other way!

Ingredients 1 serving (I did 1/2 of this but a little more than 1/2 of sauce)

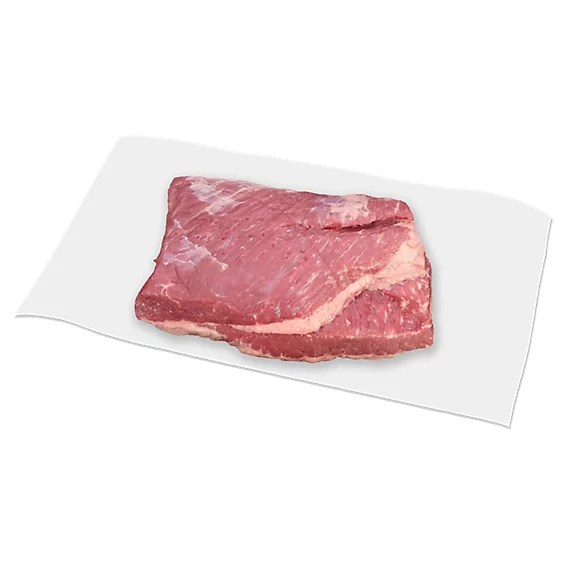
  • 12 boneless skinless chicken thighs, 1.3kg total
  • ⅛ cup olive oil
  • 2 tablespoons honey Dijon mustard
  • 6 cloves minced garlic, or 3 very large ones
  • lemon zest , two lemons zested
  • ½ tablespoon salt, you may need less if using regular table salt
  • dry oregano, to taste
  • 1 cup water, or stock (for the bottom of the pan)
  • Instructions 
  • Preheat the oven to 425F (220C).
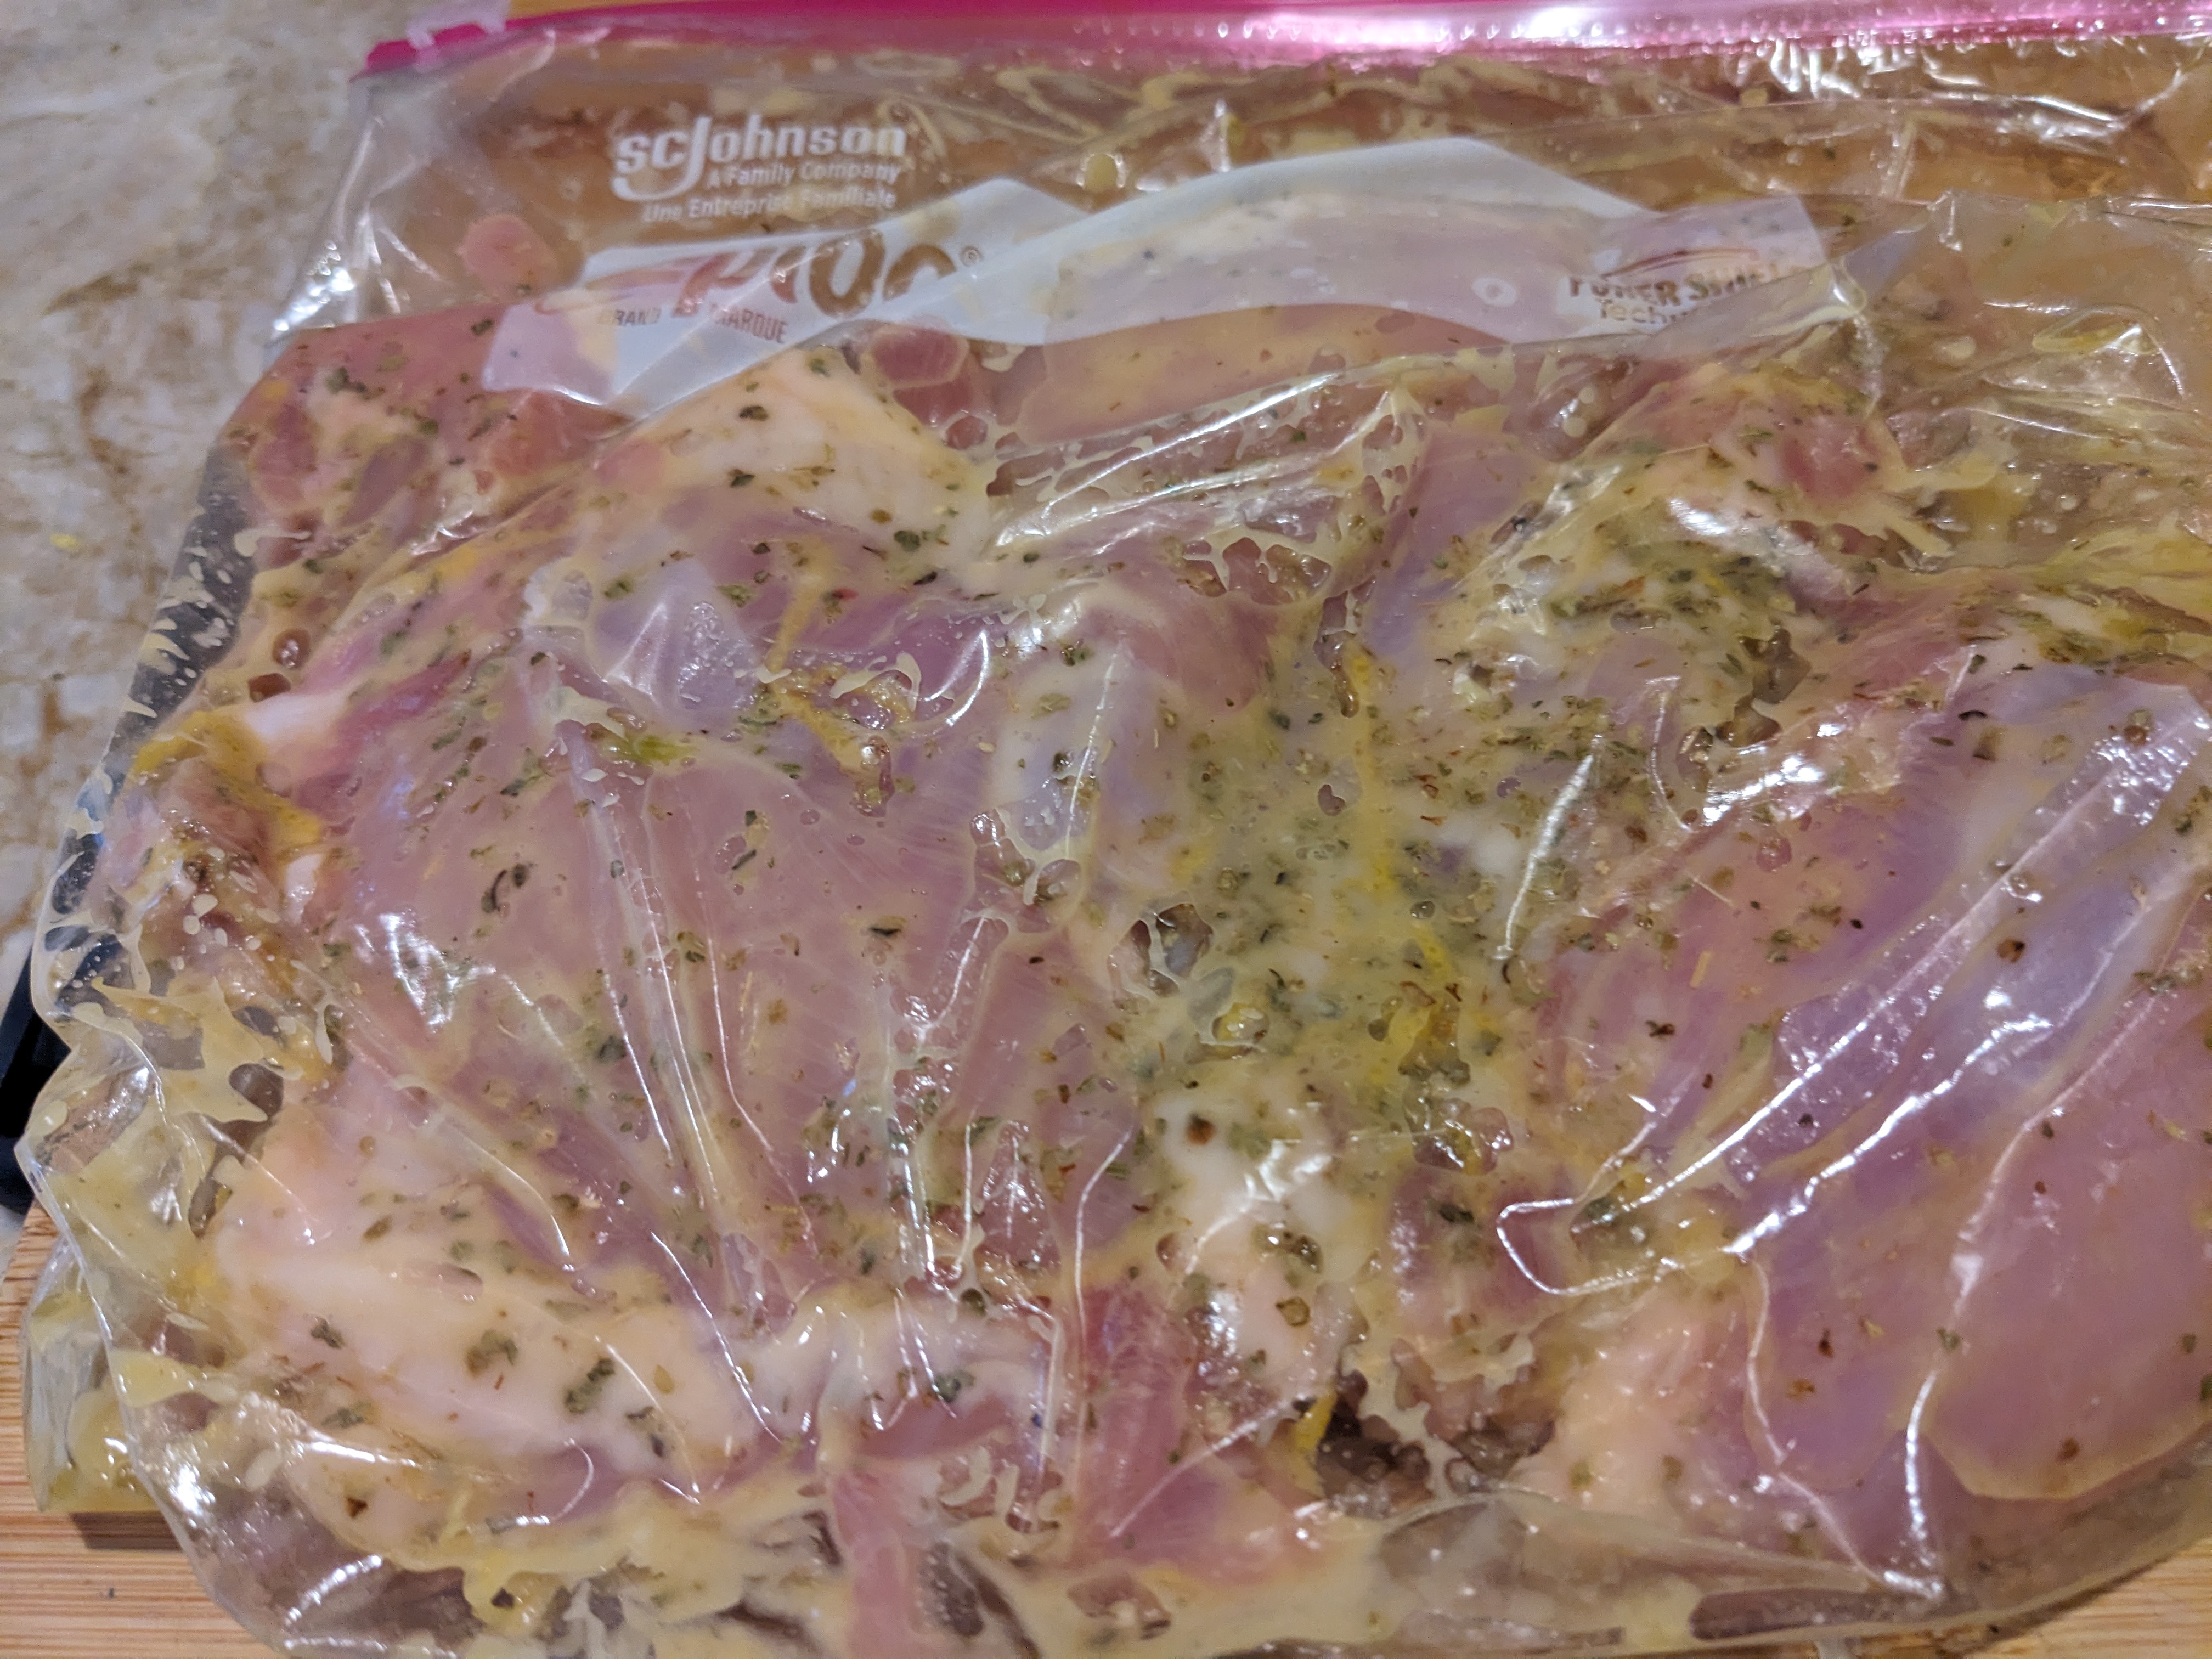
  • In a bowl add the chicken, olive oil, honey Dijon mustard, garlic, salt, lemon zest, and oregano. Mix well. You can marinate for a minimum of one hour (even overnight for best results).
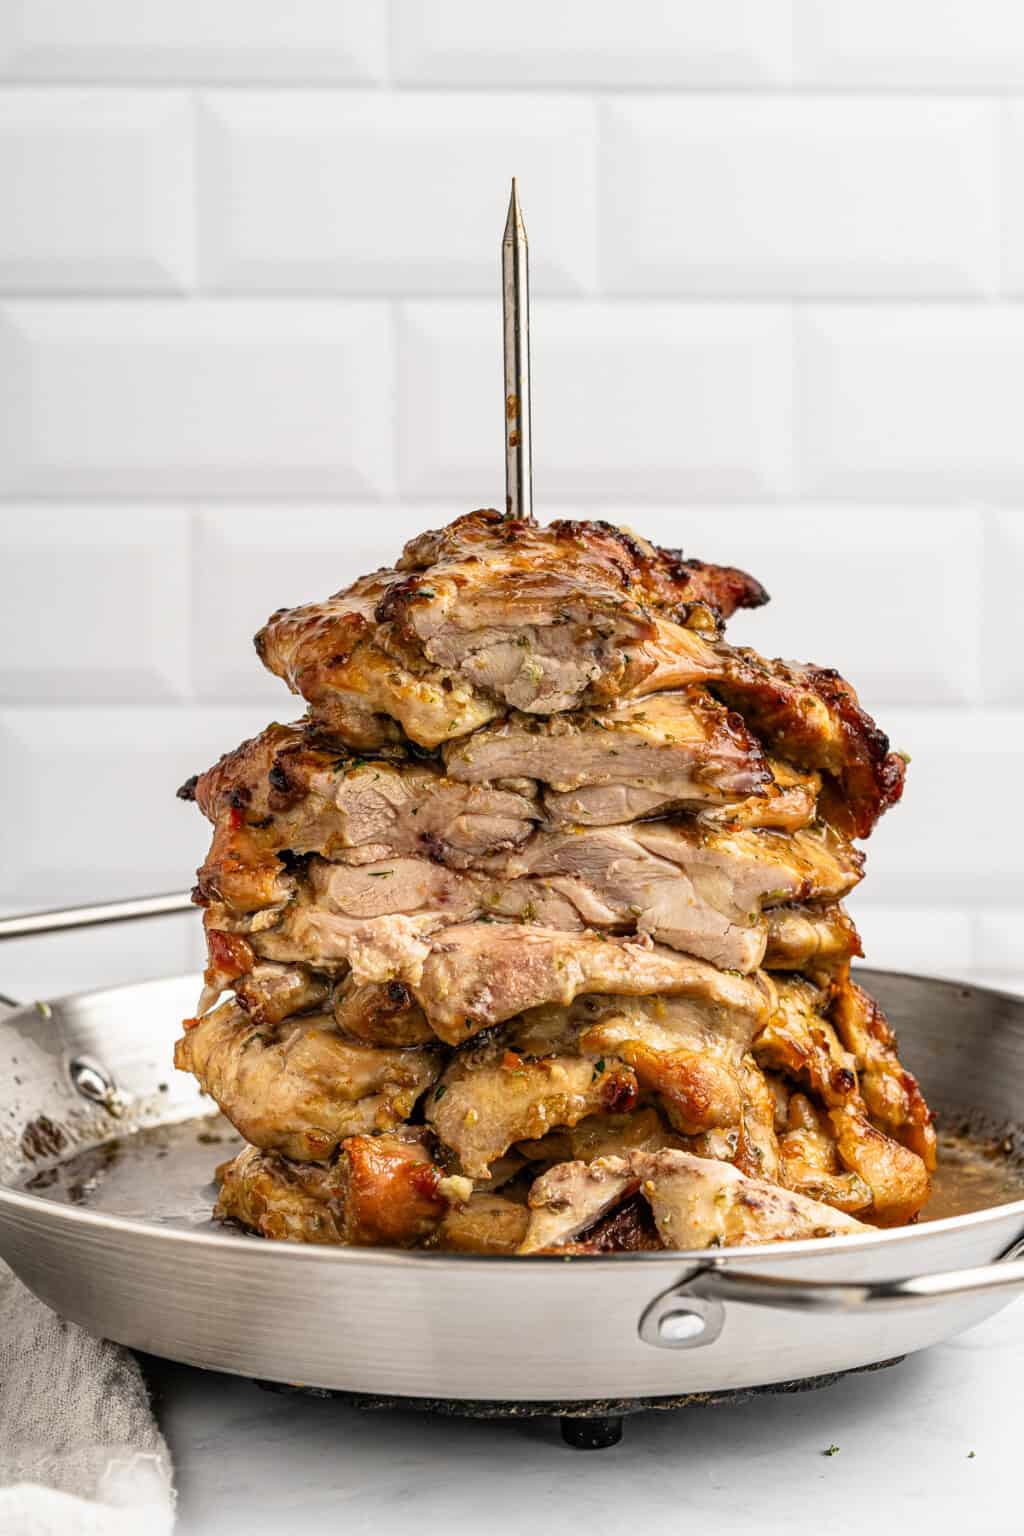
  • Once marinated, take the Vertical Gyro Spit Plate and thread the chicken thighs making sure to rotate each one opposite from the last.
  • Note: if you don’t have a Vertical Gyro Oven Plate, cut an onion in half, place it on a baking sheet lined with parchment (or foil) and position two wooden skewers vertically into the onion and voila, you made your own spit and don’t need to buy one!
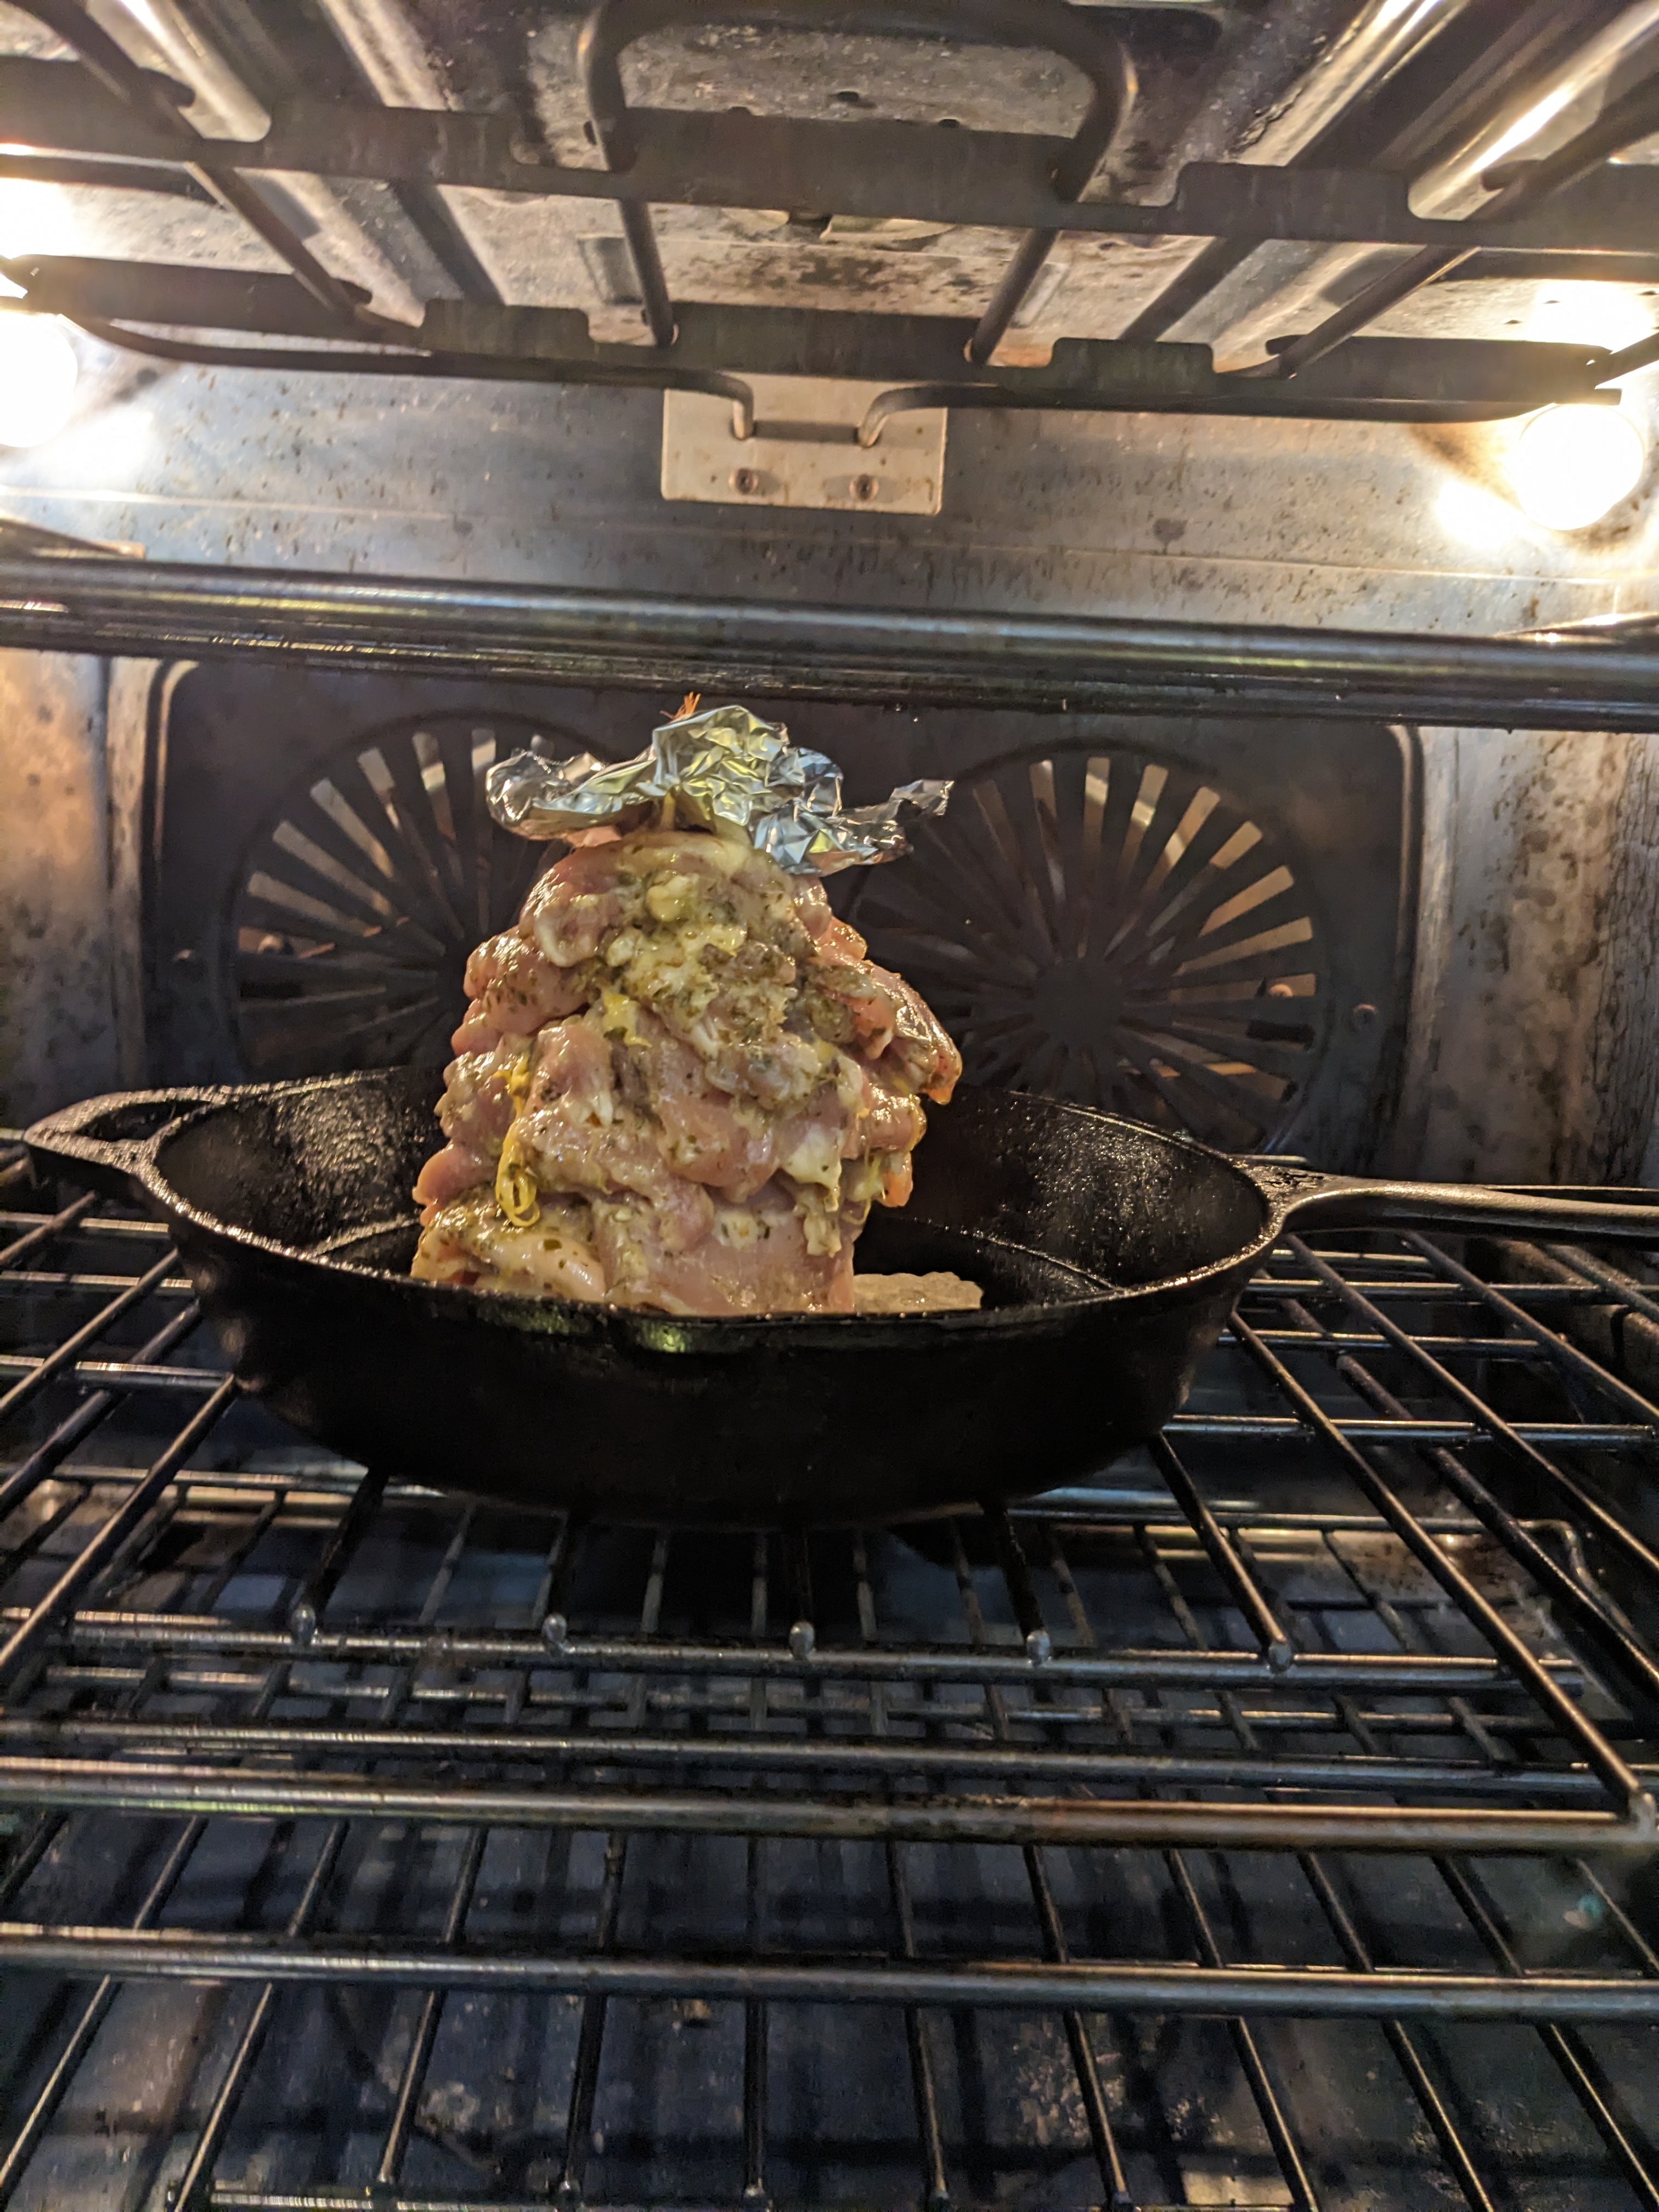
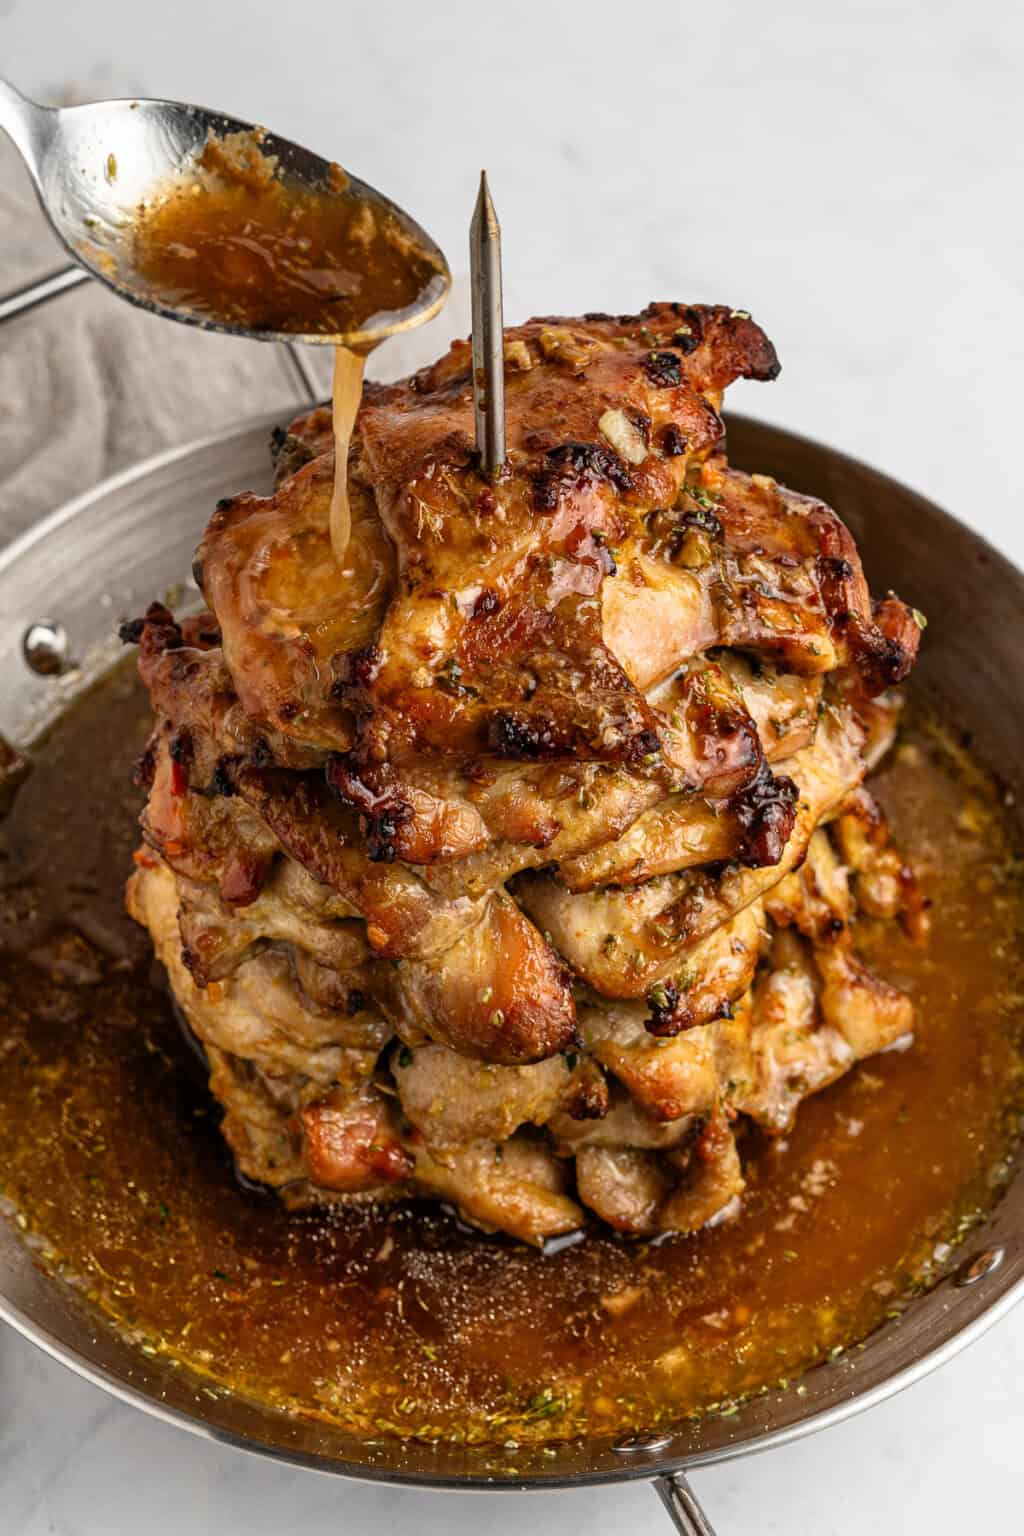
  • Now, place the gyro in the oven and add 1 cup of water or stock to the base (which will create our sauce).
  • Tip: you can pierce a small piece of foil making sure to cover the top chicken thigh as it will start to burn first on the top as it bakes.
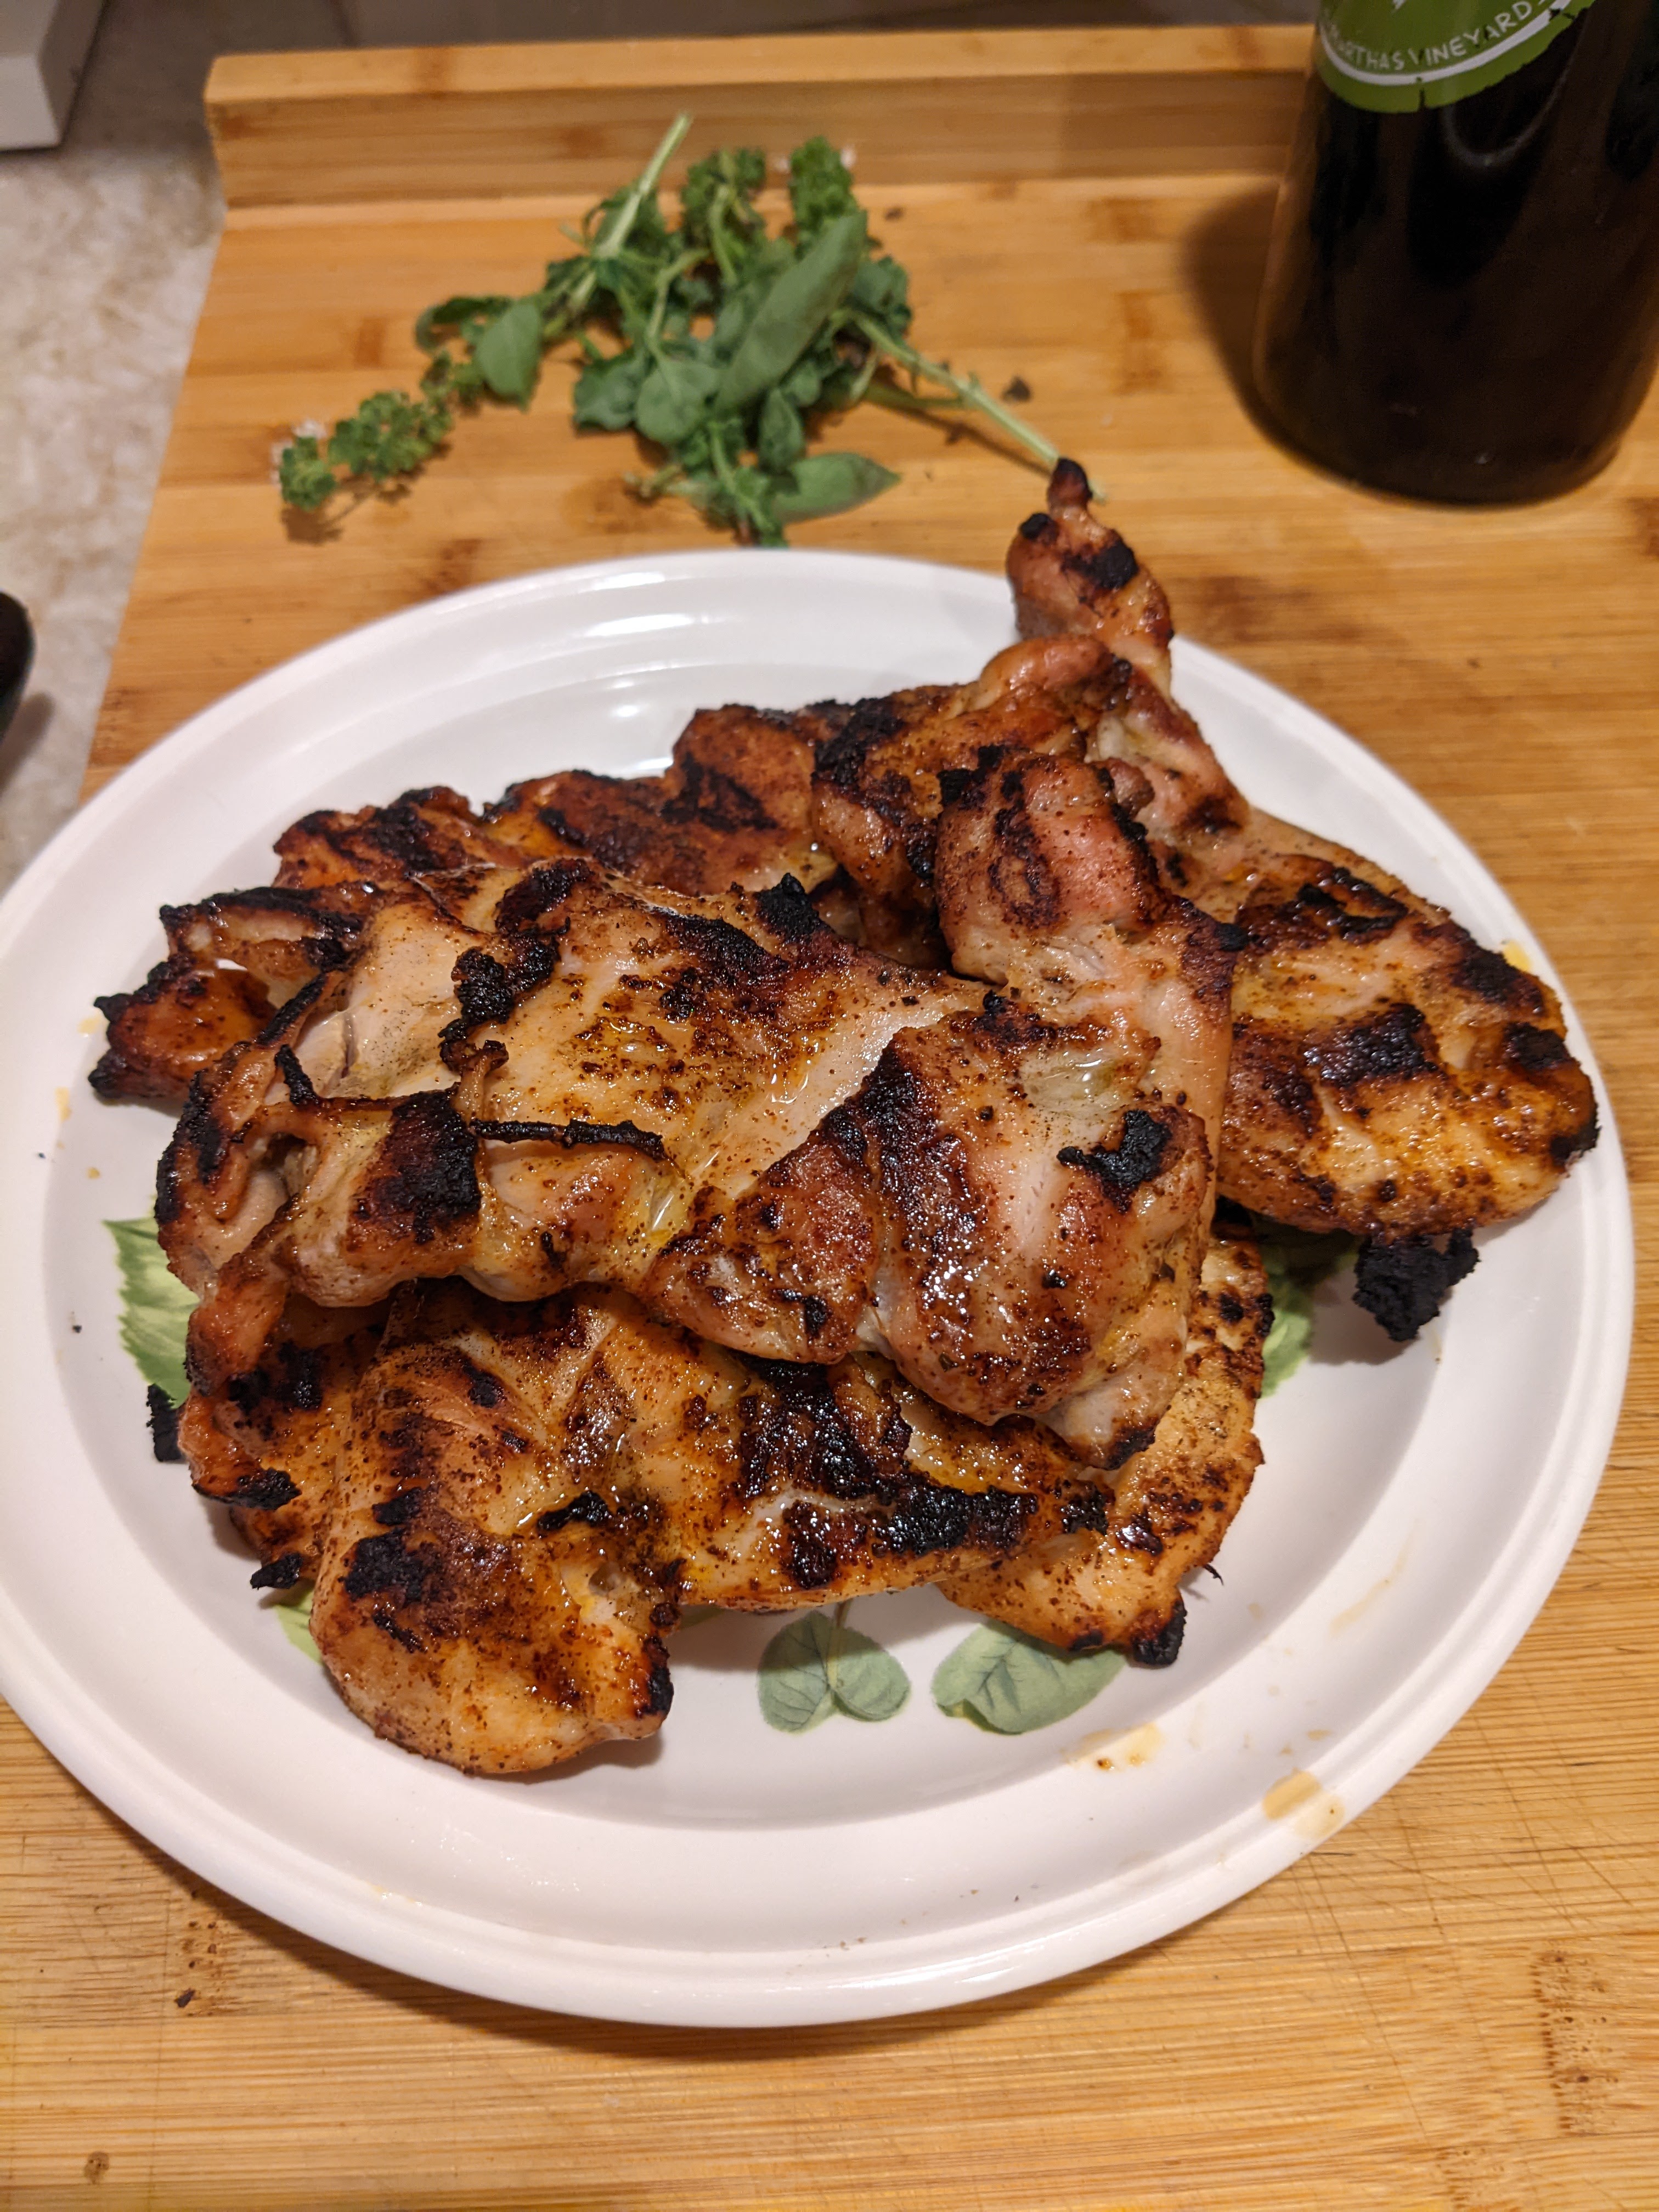
  • Bake for 75-90 minutes or until fully cooked. Mine took exactly 1.5 hours.
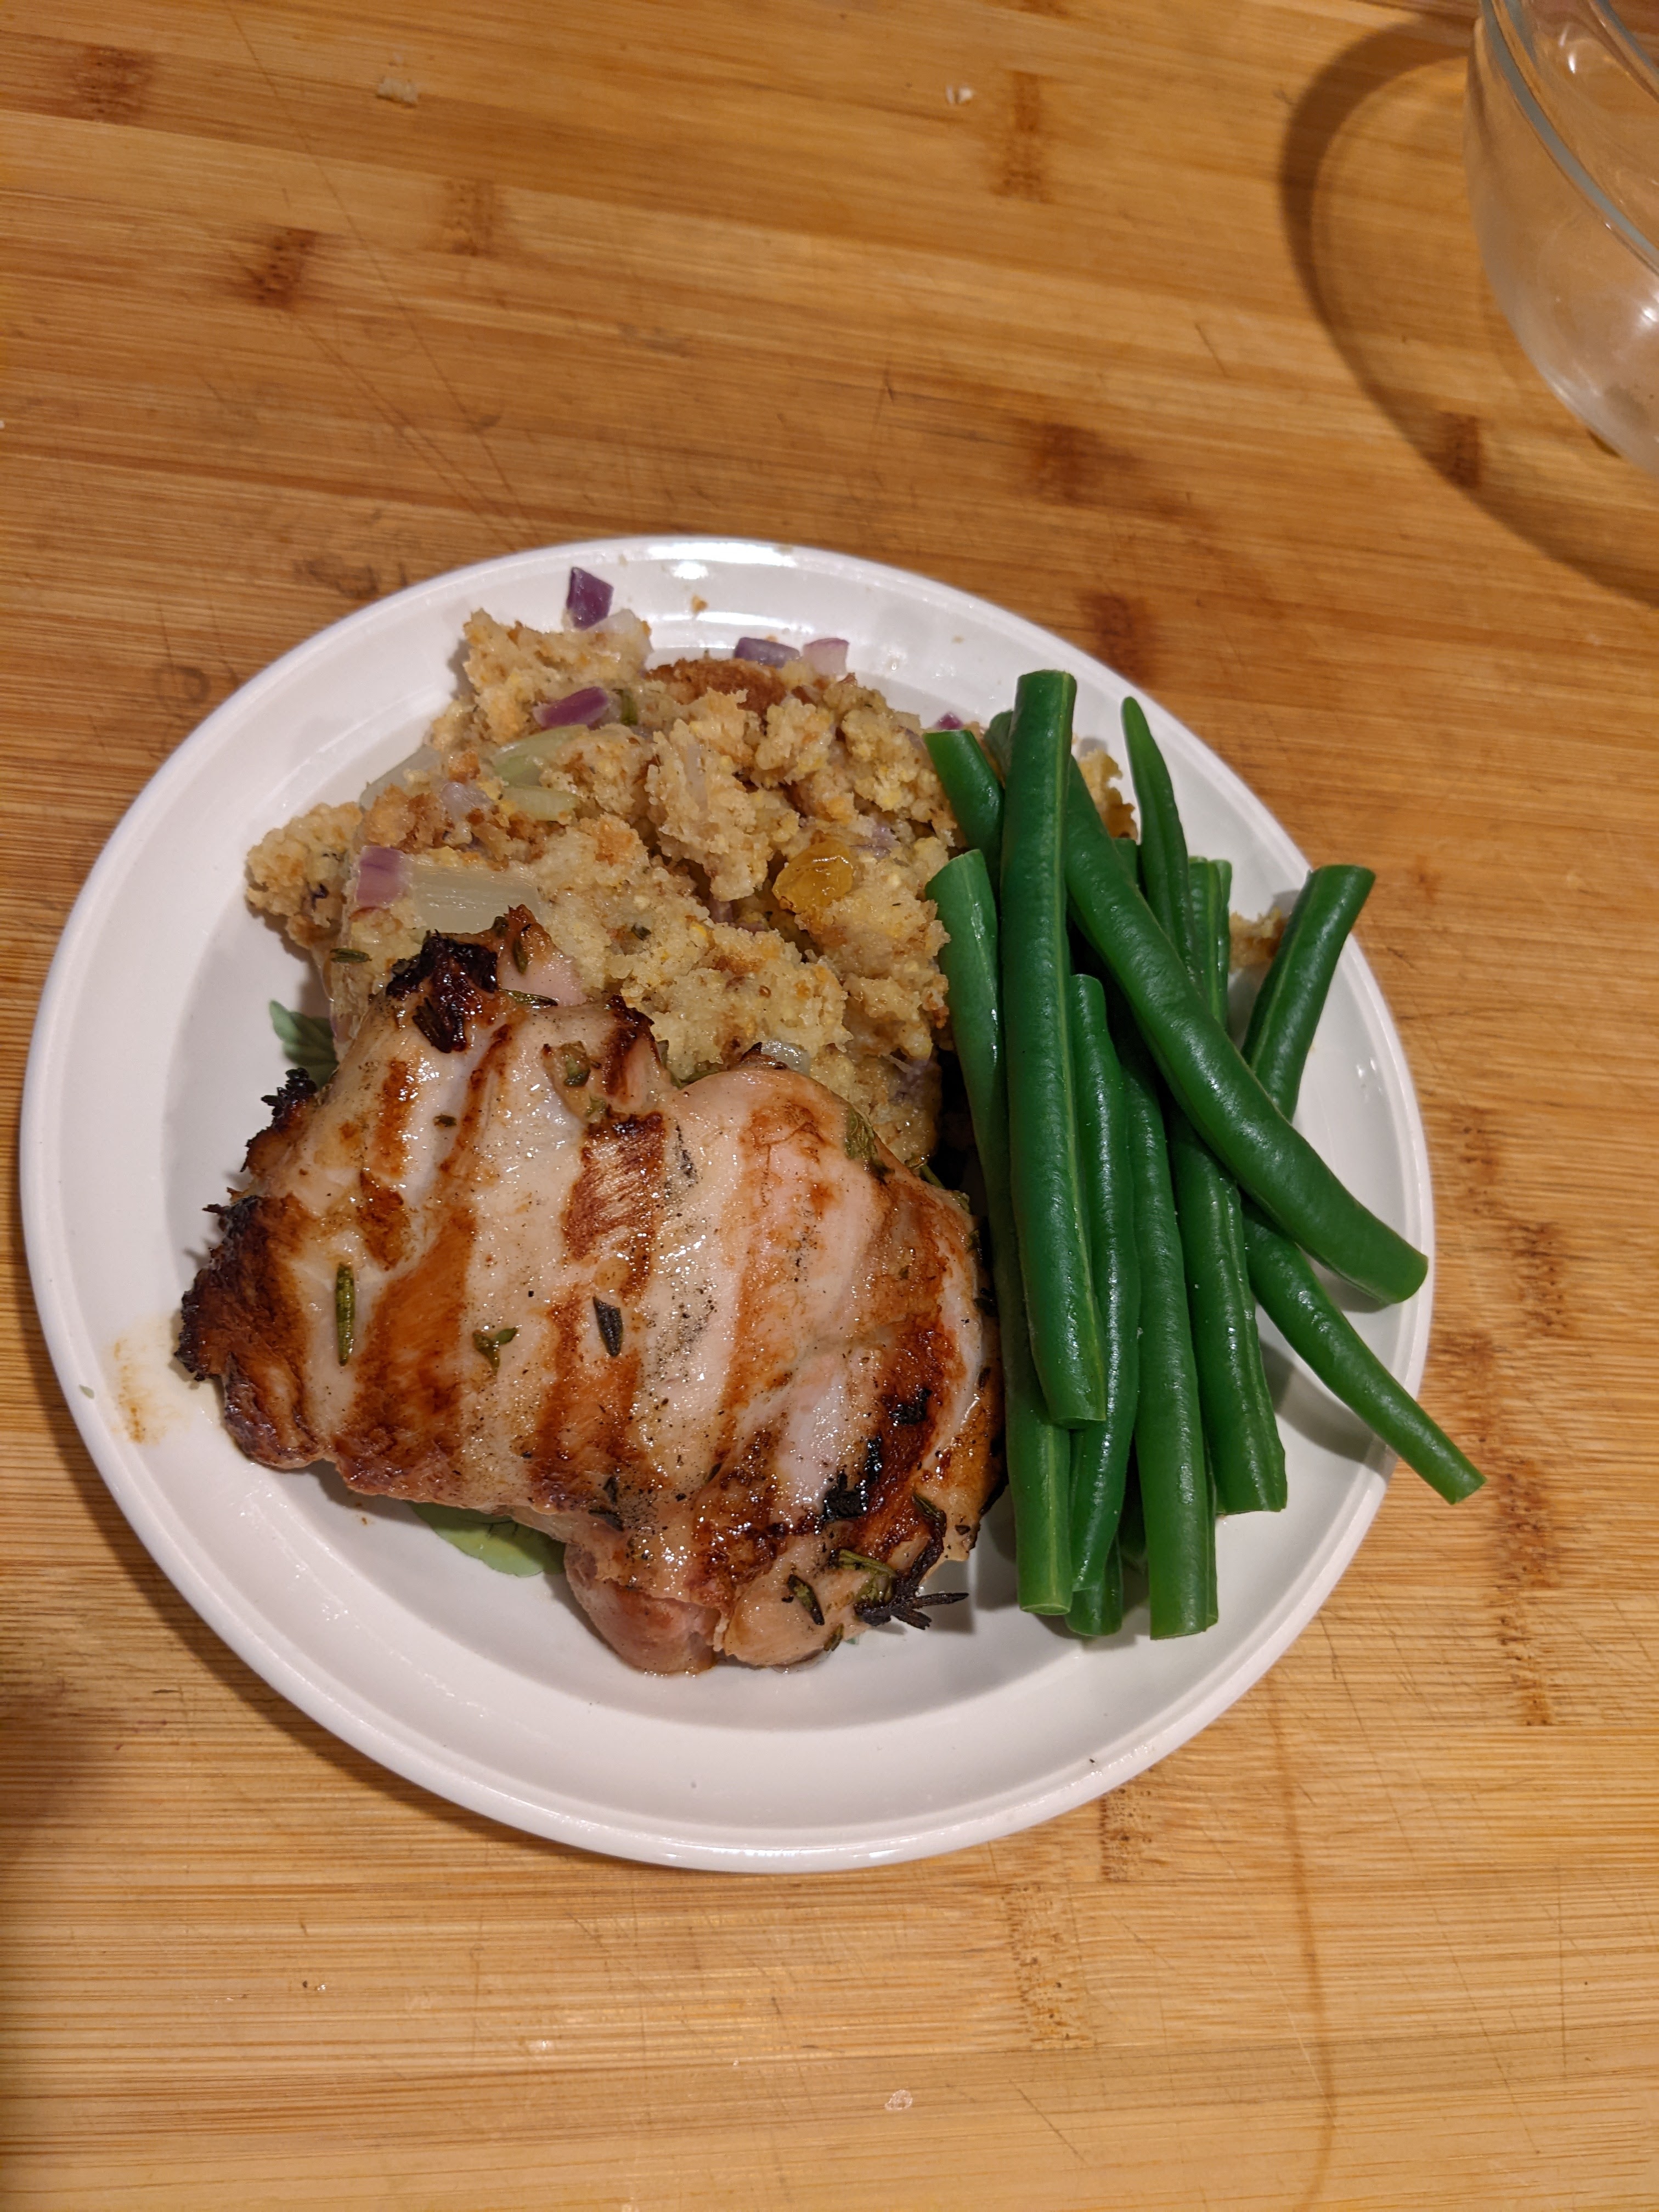
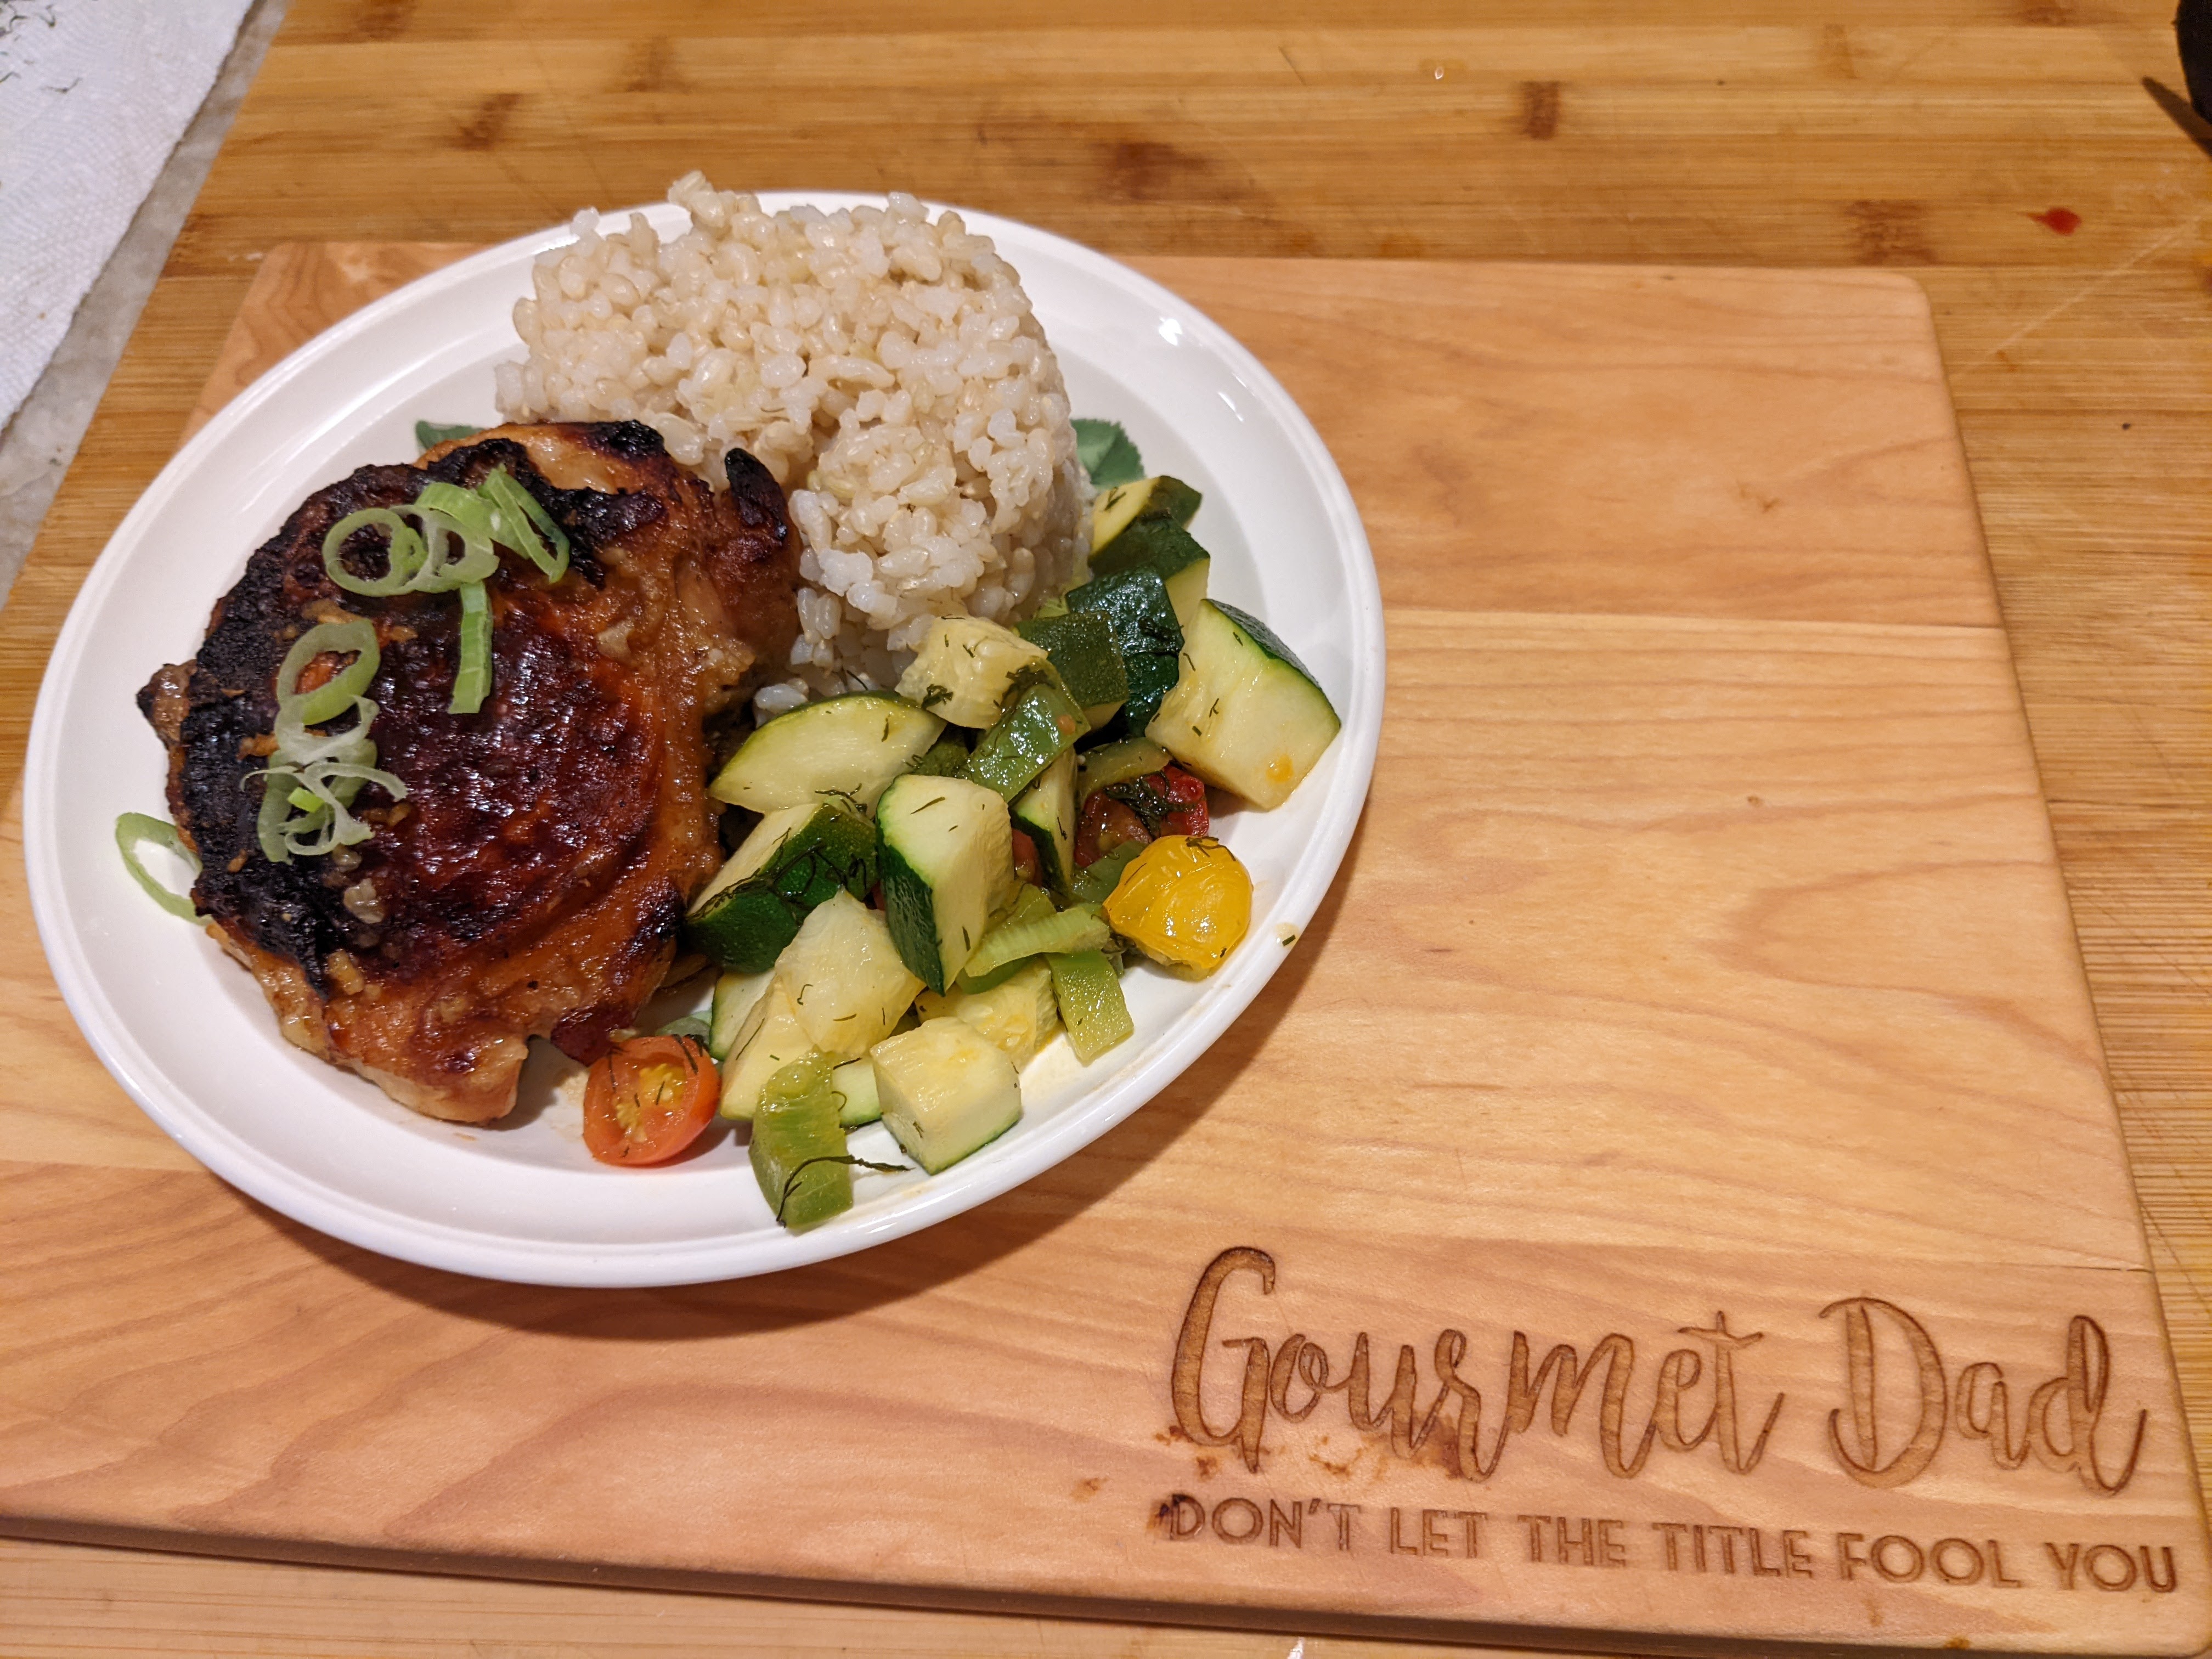
  • Take it out of the oven, let it rest and cut! You can enjoy this chicken gyro with loaded Greek fries, on pita with tzatziki, on a Greek Salad and so much more!
  • My Note: My mistake was using cast iron pan the water evaporated to quickly

Her pictures

Flat vs. Point Cut Brisket

Flat vs. Point Cut Brisket

When you’re not buying a whole brisket — those can be around 10 to 16 pounds — there are two distinct cuts of brisket, depending on which end you use.

  • The flat cut is wider, less thick, and more evenly shaped, with a layer of fat on one side. Flat cuts of brisket are typically used for classic oven-baked brisket. The flat cut, also known as the lean cut, holds its shape much better when sliced.
  • The point cut is more marbled through and thicker with an irregular shape. It also has a bit more connective tissue. Point cut brisket has a shreddy texture once braised, making it an ideal choice for sandwiches and tacos.
  • The Whole Brisket is the pectoral muscle of the steer or heifer. This muscle gets a workout because of the pasture-raised lifestyle of our animals, making the cut very tough and extremely flavorful, which is why it’s perfect for slow-cooking methods like smoking.
  • WHOLE FLAT /Single POINT / Single

T

Don’t forget the Corned Beef:
A brisket that has been cured in a brine (salt, water, and sometimes spices) for several days, resulting in a salty, tender, and often pinkish-red meat.

Here’s the Secret to Juicy, Perfectly Cooked Chicken

Here’s the Secret to Juicy, Perfectly Cooked Chicken

Secret to Juicy, Perfectly Cooked Chicken from Food and Wine mag

I thought everyone could use a reminder or hint, could be may age showing but I’m constantly looking this up, only to say Geesh I knew that.

Nailing a perfectly cooked, juicy chicken breast can often feel like a fluke and a reason to celebrate. However, achieving chef-level chicken every time is easier than you think and it all comes down to temperatures. A meat thermometer is your best friend when it comes to cooking chicken. An accurate measure of the internal temperature of the meat is the only surefire way to judge doneness. 

The USDA recommends cooking chicken to a minimum internal temperature of 165°F. However, a single target temperature doesn’t reign supreme — white meat and dark meat should actually be cooked to different temperatures. Plus, home cooks often don’t take into account carryover cooking, which is likely the culprit of many dry chicken breasts. Here’s how to cook juicy chicken every time. 

What is carryover cooking?

Carryover cooking takes place when a meat is resting before cutting or serving it. In addition to allowing the juices time to redistribute, resting the meat also plays a part in doneness. Even though the meat has been removed from the heat source, the internal temperature continues to climb. This occurs because as the exterior of the meat cools, it releases heat in two directions — both externally and internally. As heat is released internally, the center of the meat gets warmer. It’s important to take carryover cooking into account since it can cause 5 to 10 degree increase in temperature which could be the difference between juicy and dry chicken. 

Our 50 Best Chicken Recipes

What temperature should white meat chicken be cooked to?

Cook lean white meat, such as breasts and wings, to an internal temperature of 155°F. Let the meat rest for 5 to 10 minutes to allow carryover cooking to bring the internal temperature to 165°F. While bone-in chicken takes longer to cook than boneless chicken, it’s more forgiving and less likely to dry out if you accidentally overcook it by a few degrees. 

The Chicken Recipe That Changed My Life

What temperature should dark meat chicken be cooked to?

Dark meat, such as legs and thighs, contains more connective tissue and fat than white meat and can withstand, actually benefit from, cooking to a higher internal temperature. Connective tissue starts to break down around 150°F and continues to soften and melt as long as the temperature stays above this point. While it’s completely safe to eat dark meat chicken that’s been cooked to 165°F, the meat is actually more tender and juicy if it’s cooked to 170°F and allowed to rise to 180°F with carryover cooking. 

What temperature should a whole chicken be cooked to?

Cooking a whole chicken, whether on the grill or in the oven, can be a little more tricky because it contains both white and dark meat. Position the chicken with the legs pointed towards the hottest part of the grill or the back of the oven. Cook the chicken until a meat thermometer inserted in the thickest part of the thigh registers 155°F. Thighs typically take the longest to come up to temperature, so by this time, the breast will be above 160°F. Let the chicken rest for about 10 minutes and carryover cooking will bring the thigh temperature to 165°F. Cooking a whole chicken requires compromise — in order for the dark meat to be cooked through, the white meat will have to cook a little longer than necessary.

How to use a meat thermometer?

When measuring the internal temperature of chicken, insert an instant read meat thermometer into the thickest portion of meat. Be sure the thermometer probe is not touching a bone which can cause an inaccurate reading.

Liang Main (Chilled Sesame Noodles)

Liang Main (Chilled Sesame Noodles)

Lyn found this recipe and thought it would be good for our no meat Monday meal. It was! I love the taste of toasted sesame oil and have never used sesame paste so I thought give it a try. Couldn’t find it in the grocery stores in our area and seeing that there were no chinses markets close enough so it was Amazon to the rescue.

Ingredients

  • 1 lbs. fresh noodles or dry 8 oz..

Sesame sauce

  • 4 tbsp (1/4 cup) Chinese sesame paste.
  • 1 tbsp Mayonnaise.
  • 1 tsp Chili Oil (divided – 2 tsp and 1 tsp).
  • 2 tsp sesame oil (divided 1tsp-1 tsp).
  • 3 tbsp light soy sauce.
  • 5 tsp Chinese/Taiwanese black vinegar.
  • 4 tsp water .
  • 1 tsp Chinese/Taiwanese black vinegar rice vinegar or even wine. vinegar is fine if you can’t find this.
  • 4 tsp fine sugar.
  • 1 tsp garlic crushed.
  • 1 ½ fresh grated ginger.
  • ½ tsp fine salt to taste.
  • 1 tsp ground white pepper or a very generous grind of black pepper to taste.

Other optional ingredients

  • 4 hardboiled eggs
  • 160 g beansprouts (2 handfuls)
  • 4 scallions thinly sliced.
  • Persian or mini cucumber sliced in matchstick size.

Instructions

  1. Bring 3 quarts of slightly salted water to boil in a large pot. Add noodles and reduce heat to maintain a gentle simmer, stirring occasionally, 3-5 minutes until almost tender. See package instructions.  The center of noodles should be firm and slightly opaque.     Meanwhile place 1 tsp sesame oil in large bowl.
  2. Drain noodles very well in colander add to bowl and mix to coat. Transfer to baking sheet and spread into an even layer. Refrigerate until cold, about 20 minutes.
  3. While this is cooling whisk together sesame paste, mayonnaise, 2 tsp of chili oil and remaining 1 tsp sesame oil. Now add soy sauce, vinegar, water, sugar, 1 tsp garlic, and ginger and whisk until smooth.  Season dressing with remaining chili oil and ½ teaspoon of garlic.  Add noodles and toss until well combined.
  4. Divide noodles evenly among serving bowls and garnish your choice cucumber, scallions, eggs and bean sprouts or have these on separate plate for others to garnish how they wish.

Info

Chinese sesame paste and tahini are both made from sesame seeds, but they have different ingredients and flavors:

Ingredients

Chinese sesame paste is made from toasted sesame seeds, while tahini is made from raw sesame seeds.

Flavor

Chinese sesame paste has a stronger, nuttier flavor, similar to unsalted peanut butter and fresh-pressed sesame oil. Tahini has an earthy, slightly bitter flavor, with a toasted sesame seed flavor that’s not as sweet as peanut butter

Recently made

Recently made

Backyard Grape Jam

Backyard Grape Jam

Our house is surrounded by wild concord grape vines which form a blind and the neighborhood kind of disappears. It reminds my of my childhood on Cape Cod hanging out with friends in the trees with the smell of ripe grapes in the air, filling up on the fresh grapes and spitting seeds.

Our yard is not that sunny so the grapes rarely are pickable but do make cutting the lawn tricky, you try walking on green marble like grapes that have fallen. I have made stuffed grape leaves with some of the young leaves and this year a vine that snaked its way thorough the tree limbs into the front yard grabbed enough sun to ripen. So I grabbed my pruner on an extension pole and snipped what I could reach, must have been a comical scene to watch not know what I was doing.

I proudly ate some that night while watching the news but the skins were a little on the bitter side so using my wife face as a guide I decided to and try and make some jam. I reviewed a few recipes for ideas but they all had so much sugar so I decided to cut that amount down by a good half. I did not use pectin so it was basically grapes, chopped skin and sugar.

It as fairly easy although time consuming and a little PIA getting the seeds out.

First squeeze the grape out of the skins forming two piles finely chop the skins and place in saucepan, cut the grape in halve and remove the seeds. That part was time consuming and the PIA so much so that Lyn came over and helped. When completed into the sauce pan with the sugar. To me the “jam expert” making this one and only time it appeared that there was enough liquid so I did not add any water. then I brought to a boil while mashing with a potato masher then simmered mashing and stirring until it got to what I thought looked like a good consistency about 20-25 minutes. Many seed that were in the mixture floated to the top and were easily picked out. Note: the seeds are easily swallowed and really don’t need to bbe taken out but for a jelly or jam I suggest they are.

Then into canning jars and placed in the canning pot of boiling water for a 10 minute bath which I had dug off a shelf in the basement, dusted off and rinsed. Turned off the heat and let sit for 5 minutes then on top towel on counter to cool. I had read that it should be aloud to set for 48 hours so after they popped and sealed I placed to the side. This morning I mad toast and had my first taste. Not bad, not too sweet and not to thick. I would prefer it a little thicker but and not going to empty the jars and boil down again, I’ve had enough.

Thinking about using some a for basting/glazing grilled chicken maybe a piece of salmon.

Seeing that I am a google/android user it is always listening to me making suggestions etc., basically invading my privacy, and this morning in my news feed was a link to Martha Stewart’s article on concord grapes.

Rosemary Blossoms

Rosemary Blossoms

I could go on a long babble about rosemary blossoms but the thing I like most is my wife’s face when she see them.

Rosemary is a fragrant evergreen herb native to the Mediterranean. It is used as a culinary condiment, to make bodily perfumes, and for its potential health benefits.

Rosemary is a member of the mint family Lamiaceae, along with many other herbs, such as oregano, thyme, basil, and lavender.

The herb not only tastes good in culinary dishes, such as rosemary chicken and lamb, but it is also a good source of iron, calcium, and vitamin B-6.

It is typically prepared as a whole dried herb or a dried powdered extract, while teas and liquid extracts are made from fresh or dried leaves.

The herb has been hailed since ancient times for its medicinal properties. Rosemary was traditionally used to help alleviate muscle pain, improve memory, boost the immune and circulatory system, and promote hair growth.

Fast facts on rosemary

  • Rosemary is a perennial plant (it lives more than 2 years).
  • The leaves are often used in cooking.
  • Possible health benefits include improved concentration, digestion, and brain aging.
  • Very high doses may cause vomiting, coma, and pulmonary edema.

Lifehacker: The Different Kinds of Paprika and How to Use Them

Lifehacker: The Different Kinds of Paprika and How to Use Them. https://lifehacker.com/the-different-kinds-of-paprika-and-how-to-use-them-1847330811

A Trip to Tower Hill

We like Tower Hill all the flowers, trees, classes and walking paths

Pasta With Roasted Pepper and Manchego Pesto

Pasta With Roasted Pepper and Manchego Pesto

Makes 4 servings

Melissa, my pseudo adopted daughter,  and family sent us a nice cheese package for Xmas and one was manchego cheese. Lyn saw this recipe in the Boston Globe and we tried and will try again and again. Of course, I cut it in half since there were only two of us but here is the complete recipe for 4.

From Milk Street: The idea for this pesto came from Spanish romesco, a heady sauce that counts nuts, olive oil, smoked paprika, and dried ñora peppers among its ingredients. In keeping with the Spanish theme, we use manchego cheese, a semi-hard aged sheep’s-milk cheese with grassy notes, a subtle piquancy, and a salty-savory finish. A generous dose of oregano adds bold herbal flavor and freshness.

2¾ ounces manchego cheese (without rind), chopped into rough 1-inch pieces

1/3 cup whole roasted or raw almonds

2 tablespoons fresh oregano

Note: I used a heaping tablespoon of dried, since my fresh is buried under 15″ of snow

1½ teaspoons smoked paprika                

Kosher salt and ground black pepper

1/3 cup extra virgin olive oil

¾ cup drained roasted red peppers, patted dry

1 pound Fusilli pasta (you could use whatever pasta you like)

In a food processor, pulse the manchego to the texture of coarse sand; transfer to a bowl. Process the almonds, oregano, paprika, ¾ teaspoon salt, and ½ teaspoon pepper until finely chopped, scraping the bowl. Add the manchego and half the oil, then process until smooth. Add the peppers and remaining oil; pulse until creamy.

Cook the pasta in a large pot of salted water until al dente. Reserve 1 cup water, then drain. Toss the pasta with the pesto, adding cooking water as needed to help the sauce cling. Season with salt and pepper.

What is Fusilli (foo-SILL-ee) it is a type of Italian pasta shaped like curly spirals or little springs. Fusilli is often served with thicker sauces like meat sauces and heavy cream sauces, since the grooves in the pasta trap sauce. The word fusilli comes from “fuso” meaning spindle—a spindle rod is traditionally used to spin the strips of pasta into a spiral shape.